
2026 Tesla Model Y Juniper Performance Front Lip Splitter! #tesla
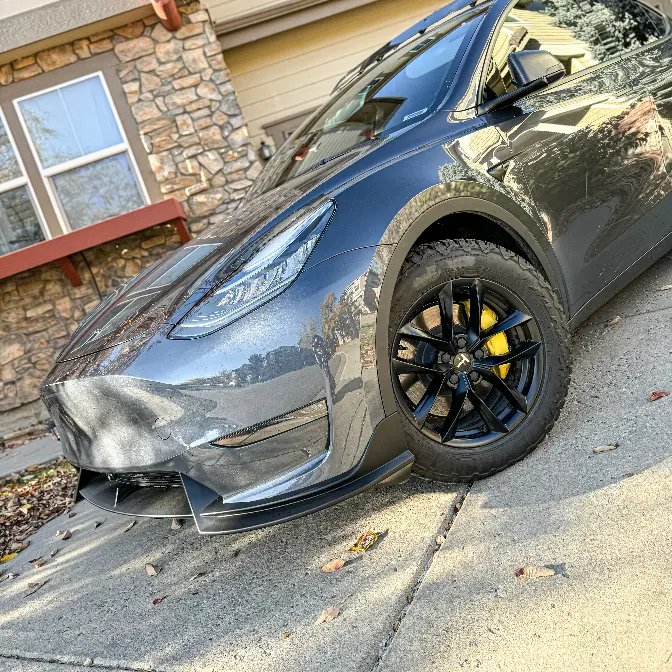
Here is the link for new performance front lip / Use Code: DADTC
https://evbase.biz/45MjfWm
Enjoy the Video?
Support the channel by buying me a COFFEE to fuel my creativity ☕️https://www.buymeacoffee.com/dadstoyscars
Thank you for your awesome support! ❤️
#thenewaero #tesla #teslamodel3 #model3accessories #modelyaccessories #teslamodely
Thank you for watching!
Facebook: Dad's Toys & Cars
Follow me on Instagram: dadstoys_cars
Please LIKE, SUBSCRIBE & SHARE :)
Hey guys, Paulie here, welcome back to the channel.
So today I have something special to share with you for the new Model Y Juniper.
As you can see, my new Model Y Juniper is no longer the same as the rest of the Model
Y Juniper on the road because I just added the new front lip spoiler for the new Model
Y Juniper.
So in today's video, I'll share with you what comes in the box of this new front lip and
then step by step installation.
It shouldn't take more than 20 minutes to install by yourself.
So today I'll be installing the whole process on the front lip by myself.
And then at the end, I'll show you what it looks like on the new Model Y Juniper.
Now let's go.
And here's everything that came in the package of the new Model Y Juniper front lip.
I got the matte black finish so it matches the matte black trim on the lower trim of
the new Model Y Juniper front bumper.
We'll see how it looks on the car after the installation.
And it came in three different pieces.
So we have to install the three pieces together first.
So the middle piece, left and right.
And it also came pre-installed with the double-sided tape.
I have installed something similar on my current Model Y and it sticks really, really well
because these kind of front lip, they actually grab on to your front bumper.
They don't actually attach from the bottom.
So they stay really, really well.
We'll see if I need to screw them.
I don't want to screw onto the lower part of my front bumper if it's not necessary.
But I will add extra double-sided tape on the bottom part right here.
As you can see, it doesn't come with the double-sided tape on the middle part right on the bottom.
So I will add that.
It doesn't come with the extra double-sided tape.
I hope it came with it.
But I do have a few spare double-sided tape with me and it came with all the screws here.
So the black screws are for the one that you attaching the front lip to the actual bottom
part of the bumper.
I'm not sure I will use that.
I will see later in the video.
And the longer ones, silver, you attach these two to this part of, I'm not sure if you can
see it, right here to attach and put them together.
And there are short silver screws which is these right here because you have to screw
this part and this part together.
Now that we saw everything that came in the box, let me show you where to get this new
front lip.
You can get this new front splitter or front lip for the new Model Y Juniper from EVBASE
or EVBASE.com.
As you can see here, there are four different options that you can pick.
This is the matte black that I got in the video and then gloss black, matte carbon fiber
texture and gloss carbon fiber texture.
And if you are interested, you can use my special discount code, DATTC for extra 20%
off.
And this is the price after the discount which is really affordable, which means, you know,
I don't have to worry about it being scratched or scraped in the future.
All right, now let's go and install it on the new Model Y Juniper.
All right, so before we install on the car, let's attach them together first.
So you would have to match these two screws holes to this part of the left and right side
of the front lip.
There are two screws and then this bottom part right here too.
So just kind of put them together like so and then just screw it in.
And also the bottom part too, this one too.
So this one, you use the smallest one, the shortest one.
All right, so one side is done and just repeat the same thing on the other side.
And this is what it looks like after you attach all three pieces together.
And I also added one more strip of double-sided tape in the middle part of the front lip.
I think now we are ready to install on the car.
Now let's start with the installation.
Before we start, make sure you clean the surface that we are applying the front lip first.
First top surface and bottom surface.
So top surface most likely to be this part right here.
So all the plastic, black plastic on the bottom of your bumper.
And then the bottom surface is pretty much about, I would say, at least five inches down
to the bottom.
And next step here, just use the rubbing alcohol, apply on the cloth and clean the surface again.
Make sure there's no dust at all.
Now before we actually install it, I will try to test fit it first.
So we know exactly the position of the front lip.
So this part right here, as you can see, this is the center of it.
So try to aim it towards the camera, the front camera of a Model Y Juniper.
And then everything should fall in place.
So if this, this one right here, right in the middle of the camera, then everything
else should fit perfectly, as you can see here.
I don't really think I need the screw to hold this in place.
Just like my previous Model Y, it fits really well without the screws.
Okay, so before I install it, I would peel the adhesive from the middle part because
we are aiming the middle part first.
So we attach that first and then peel it halfway like this, everywhere, except on the side,
peel all the way, like you see.
All right, now let's install it.
All right, so we are going to aim, as we discussed, to the middle part and then I'll try to remove
this before I push it in, the top one first, like so, before I push all the way in, in
the middle, remove the bottom two piece.
Now we go on this side.
Now we remove this part and then just right in the bottom of it, we push in all the way.
As you can see, make sure this part covers everything.
And then this side covers all the way, hold it a little bit, we'll go on the other side.
Same thing on this side right here.
Sorry, I have to try to move really quickly because I'm doing this all by myself.
I want to make sure the adhesive still sticks really well.
Push it in all the way and stick the side, push it in, push the bottom part, push the
top part, and then each of the section, I will try to hold it for 30 seconds.
And last step here, just use a masking tape or painter's tape, as long as you can, just
make sure you wrap around the top and the bottom part, just to make sure everything
is secure in place.
So to let at least the glue on the adhesive completely seal and dry and stick to the front
bumper of the car, as you can see, I'll just stick it everywhere.
I will leave the tape about, I would say at least a few hours, or even better, overnight,
and try not to use the car just yet, so you don't create that vibrations, and it might
create a separation between the adhesive and the surface of the front bumper.
I'll leave it overnight and then see it tomorrow, and see how it looks on the new Model Y Juniper.
Alright, so I left it overnight, and then removed all the masking tape, it looks really
cool.
Let me show you the overall look on this new Model Y Juniper.
As you can see, it actually made a huge difference in terms of the design for the front bumper
of the new Model Y Juniper, look at that, it adds aggressiveness to it, it looks really
rounded and plain before, but now it has that really cool sharp angle right here, it
actually parallel with this on one angle, but then when you look at it straight, it
kind of cut it in, but still looks really really nice.
Let me show you a fitment of the front lip real quick.
So this is on the right hand side, as you can see, it's perfectly aligned to the wheel
arc on this side, and then this one right here, left a little space, I believe they
would have to give a little bit of buffer, but you can't really see it.
On here, even though you see it underneath, it's still a matte black, so you don't really
see it.
Same thing on this side, really really small gaps, as you can see, really really tiny gaps.
I tried to push it in as much as I could, but it won't go in any further, and this side
right here, perfect fitment, right at the edge of the front wheel arc, and since the
front lip actually grabbed on, as you can see, it grabbed on to the bottom part of the
front bumper, like exact the same, similar design, but the same method of installing
on my older Model Y, and it has no issue at all, without any screwing in, but you could
optionally screw in two screws on both sides, but I wouldn't do it, because it won't come
out any time soon, it sticks really really well, even though it was like a matte finish
with a plastic surface on it, not smooth surface, but it stays really really good.
And let me show you the top part.
So, the top part, only this, this part right here, would come out further from the front
bumper a couple inches, as you can see, same thing here, but this part is exactly the same,
most importantly, not how much it comes out, but does it change the clearance on the front
end?
Actually, it does not change, as you can see, it's the same clearance as before, it doesn't
add any thickness to the front end at all, so it doesn't make it lower, only that tab
right there, that is protruded out just a little bit, really similar to what I had in
my model, older Model Y.
So when you park the car, you don't have to worry about the front lip that much, it looks
really really awesome, love how it turned out, and looks, adds huge difference in terms
of overall design on the lower part of the car, now makes that light bar a lot more aggressive
with this front lip, really really cool looking.
And here's the comparison between the older Model Y front lip and the newer Model Y, they
actually both came from EV base, and this is the older version, has, I think it comes
out a little less and less aggressive on this part right here, this is the overall look
on the older one, and this is the newer version, as you can see, this part is a lot more aggressive,
and more angular here, and comes out a little more, and this one is more angular to this
part right here, compared to this one, it has more curve to it, but overall, both of
them, they both look really really awesome, and they both added that aggressiveness to
the front end of both, the older Model Y and the new Model Y Juniper.
This is Model Y Juniper before the front front lip installation, and this is after the installation.
As you can see in the video, the new front lip turned out really really cool, and it
looks pretty awesome on the new Model Y Juniper, it added that aggressiveness to the front
end of the new Model Y Juniper, now my new Model Y Juniper no longer looks the same as
the rest of the new Model Y.
Let me know in the comment down below what you think about this new front lip for the
new Model Y Juniper, I'll make sure to put the link of this new front lip in the description
down below, and special discount code for you too, thank you so much guys for watching
today's video, make sure to click like if you like the video, make sure to subscribe
for more awesome content like this, we'll see you on the next video, peace.
Transcribed by https://otter.ai