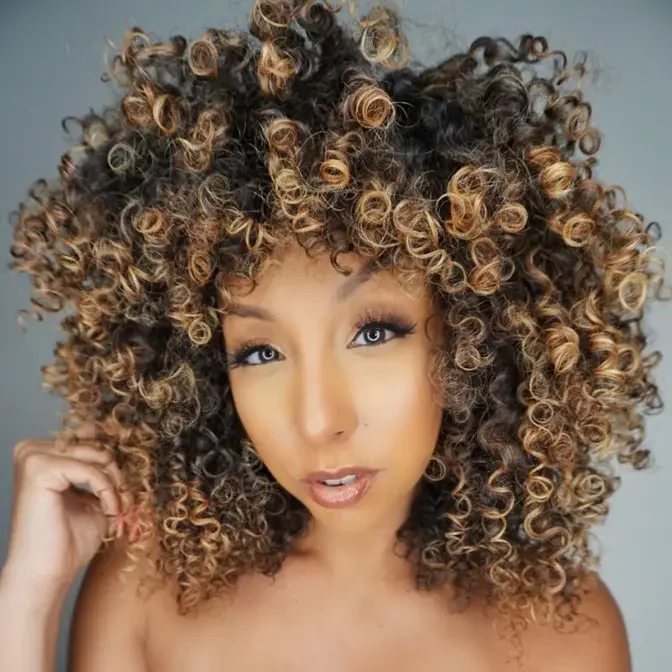
How to diffuse your curls and avoid frizz! Diffuser tips using the Ion Luxe Supercharged Hair Dryer. Shop these products at Sally Beauty. Ion Luxe Supercharged Hair Dryer https://bit.ly/3gAeasN I used the Maui Moisture Ultra Hold Gel and the Matrix "A curl can dream" oil. https://bit.ly/3gC5TEo Follow me on IG, Snapchat & TikTok for DAILY laughs & beauty tips @MzBiancaRenee!
Please LIKE and SUBSCRIBE for more videos! I post new videos every Sunday at 6AM PST.
*Some affiliate links are used, which means I may receive a commission should you decide to click that link and make a purchase. My content is 100% not influenced by brands, PR products received, usage of affiliate links, or brand partnerships.*
Follow me on TikTok @MzBiancaRenee
Follow me on INSTAGRAM www.instagram.com/MzBiancaRenee
Follow me on TWITTER www.twitter.com/BiancaReneeToday
Hey co-friends, I'm Bianca Renee and you're watching Bianca Renee Today.
And today I'm going to help you with all your diffusing problems.
My diffuser is my best friend.
I diffuse every day, well every day that I get ready, because it just gives my hair so
much more volume and once I learned how to use it properly, change the game.
So if you're watching this wondering why your diffuser is always making your hair frizzier,
I got you.
So not only am I going to give you some tips on how to diffuse, I'm also going to be kind
of like reviewing and showing you the IONLUX Supercharged Hair Dryer.
Yes!
I have another hair dryer.
I think I'm like collecting them at this point, but I wanted to give it a try.
A lot of people are talking about it, so let's get into it.
Today's video is sponsored by Sally Beauty, so if you want to get any of the products
I've used today for yourself, that's where you can get them and I'll link them in my
description box.
So here she is, the IONLUX Supercharged Hair Dryer.
It's a very chic and stylish blow dryer in my opinion, but it does have the removable
attachments.
If you want to use it to blow dry, you can, and it has the same magnetic little clip top
there.
So now let's go back to the top of the day with tip number one.
Tip number one, make sure to use a strong hold gel.
You want your hair to have a nice cast on it, so as you're blowing it around, it's not
going to get frizzy.
So this is the Maui Moisture Hairstyling Curl, Quench, and Coconut Oil Ultra Hold Gel for
thick curly hair.
My hair's not even thick, but my hair loves this gel and it really works well on my son,
just FYI.
So it smells like a tropical coconut paradise.
It is a thick gel, which is a good sign, because that's what we want before we diffuse.
And I'm just going to use the gel on its own.
I know, I'm wild.
Some of y'all are like, wait, where's the leave-in conditioner?
I don't always use a leave-in.
I actually have been a lot recently, but I'm going to take it back to my roots of just
styling with one product and see what happens.
I will get more hold if I use a gel on its own versus with a leave-in, because a leave-in
is going to give it some more moisture, therefore making your hair a little bit softer, therefore
making it a little bit more susceptible to frizz.
Let's see what happens.
We're going to get through, scrunching it up.
Okay, gel is applied.
Now, instead of just grabbing your diffuser and starting to go right away, I always have
better results when I let my hair air dry for a little bit and then I diffuse.
That's going to allow my gel to form a cast over my curls, getting a little bit of that
crunch.
Don't be afraid of the crunch.
The crunch is your friend, and it can disappear if you want it to.
So let this be the very first thing you do when you get out of the shower.
Put on your gel and then do everything else.
Do your makeup, feed your children, figure out your outfit, do all that stuff while your
hair is drying so that it can create that cast, and then we'll come back to diffuse.
Now, for some reason, you don't have time to air dry at all.
You just got to diffuse and go.
You are going to get better results by using a stronghold gel versus anything else.
I would not recommend using just a leave-in or a cream and then having to diffuse immediately.
So if you have to diffuse right away, you have to use a stronghold gel to avoid frizz.
So now I'm going to put on the rest of my face and come back.
Now I'm back, full face on, and my hair is starting to have a really nice cast.
I probably could even let this dry a little bit more, but I do want to see the drying
power of this dryer.
I want my hair to still be a little bit wet, but I have a little bit of the stiffness forming,
and that's what we want.
So not like a full dry crunch, but a little bit of some hard parts, if you know what I
mean.
Okay, so here's the cool shot button.
Then we have three different fan speeds and heat settings.
I'm going to push this.
So when the cool shot is on, the light turns blue.
What I do like is you don't have to hold down the cool shot button.
You can just push it once and it'll stay cool.
So your next diffusing tip is slow and steady wins the race.
If you have a high fan speed and super hot heat, it's kind of like too intense, too much.
Sometimes if we're in a bind, you got to go there.
But if you have the time, you want to keep it on a low or medium heat setting and a low
or medium fan speed.
So I'm going to do probably medium heat and a medium fan speed.
Your next tip you're going to want to do is dry your roots first.
Our ends are usually the driest part of our hair.
So you don't really want to start here and then go up because it's going to take longer
for this part of your head to dry.
So start at your roots, dry that first, and then work your way down.
So as you can see, I'm kind of just gently placing it at my roots, letting it sit for
a couple seconds, and then moving to a new area to dry.
When it comes to getting the top of your head, you can just put it right on there.
It has a little prong, so you're still getting some distance.
And then just slowly move it around.
Okay, now that my roots are a little bit more dry, now I can focus on the length of my hair.
I don't want to actually do what you see a lot of curly girls do, which is cut everything
in here and scrunch it up.
I'd recommend this for wavy hair to make your hair more defined, but if you have really
tight curls and you want elongation, going like this is just going to shrink your curls
even more, making them curlier, which is nice, but it's going to make it look shorter.
So I have a whole video on elongation if you guys want to watch that video, but I'm not
actually going to cup and scrunch.
I like to diffuse like this and diffuse down.
We want the airflow to be pushing all of our hair down, because if you're pushing it up,
that'll just raise your cuticles and make everything frizzy.
So remember, you want to just go like this and try to just hover everything down so that
your hair is laid down and flat and not up and frizzy.
I also like to keep it moving, so I'm not keeping any heat in one area for too long.
So remember to think about your goals.
Is your goal elongation and just for it to be dry, or are you using your diffuser to
create more definition?
So if you're creating more definition, scrunch it up.
If you already have super curly hair and you want it just to get dry and not shrink up,
you're going to blow dry down.
One of my goals with diffusing is also volume, because I have very fine hair.
So as you can see, I like to flip my hair around a lot.
That way my hair is not going to be too flat.
I'm going to keep it moving and grooving.
Some of you might be wondering when to use your cool shot.
Use your cool shot button any time you feel your hair getting really hot.
We're not trying to get heat damage while keeping our hair curly, okay?
If we want to do heat damage, there's plenty of ways to do that.
But if you feel your hair is getting a little too hot, every so often go ahead and click
this cool shot button.
That way you kind of cool everybody down.
And I do like that.
I don't have to hold it down on this blow dryer.
Now if you're ever in a hurry and you want to use your high fan speed and ultra heat
setting, then you want to keep your dryer as far away from your hair as possible.
That way you're not blowing too much hard air and blowing around your curls.
So I'm going to put on the highest fan speed and show you how I do that.
So as you can see, my curls are looking really good, still defined, and we are avoiding a
bunch of frizz.
So now that my hair is pretty much dry, I'd say it's about 95% dry, I feel comfortable
with touching it now.
You could apply some oil to your hands to also reduce frizz.
So I'm going to grab my Matrix A Curl Can Dream oil, put that on my hands, and then
I'm going to kind of scrunch.
This will give my hair some shine and also break the cast.
So if you hate hold, you don't want your curls to feel crunchy, you can go ahead and apply
this.
But as I diffuse, I'm going to slowly break apart my hair so that it can get bigger.
Do not scrunch your hair until it's dry.
If you start scrunching it while it's wet, you're going to create frizz.
So make sure you have that cast and that your hair is dry, and then it's safe to scrunch.
Now let's say you get a little too wild and carried away with your diffuser, like this.
And you notice a little bit of, not even frizz, but not as defined curls as you want.
You can always go back and fix it, you don't have to start your whole wash day over.
So right now, I mean, that looks pretty fire.
But let's say I want to fix this little part, let's just be super, super picky with it and
you're not happy with how this looks because it got a little carried away with your diffusing.
You could just add a little bit of water, just go over it, and there you go.
There's already product on your hair so you don't really need to add any more, but you
always could add a little bit more gel and kind of just smooth down any flyaways, protecting
the outer layer of your curls.
Any little frizzy spots, I don't really see any, we did a really good job.
Now that my hair is dried in a more elongated state, now I can go back in for more volume
because now my curls are past like the shrinkage stage because they've already dried in a longer
form, so now I can kind of fluff it out.
And I do that by diffusing upside down.
Oh, alright, oh, a little side part action, sometimes my hair tells me what it wants to
do.
Apparently we're doing a little side part, okay.
So there you have it, my day one hair using only one product and one bomb diffuser.
Not bad.
So overall, final thoughts on the Ion Lux Supercharged Hair Dryer.
It works great, as you can see, I've been using it a couple of my videos.
I do like that it has a memory feature, so whatever settings you use last, when you turn
it off, when you turn it back on the next time, it actually remembers your settings.
So you don't always have to change your settings every time you turn on your blow dryer, so
that's pretty cool.
Since this does have Ion technology, that's supposed to make our hair shinier, reduce
frizz, reduce heat damage, and just overall dry your hair faster.
So I love the look, I like how compact it is, and it does a great job.
If you're currently looking for a new blow dryer diffuser, this could be the one for
you.
They are available at Sally Beauty, and they retail at $249.99.
So I'll be sure to link the hair dryer and the gel I used in my description box below.
So those are all of my diffusing tips for you.
I hope this was helpful.
Leave a comment below and let me know if you've already applied some of these diffuser tips
to your routine, and which one was a game changer for you.
I think mine was waiting until my hair has a cast, but I just would not recommend diffusing
your hair with only a cream styler.
You need something with hold, gel, mousse, something to give you a cast.
Letting your hair air dry first also reduces the amount of time you have to diffuse, therefore
you're putting less heat on your hair, which is always a win.
If you have any diffuser tips of your own, leave a comment below so we could try out
what you do to make your curls pop in.
And if you enjoyed this video, make sure to give me a thumbs up and subscribe.
I post new videos every week.
You also can follow me on Instagram, Twitter, and TikTok at MsBeyonceRenee.
I'll see you guys next time.
Thanks for watching BeyonceRenee Today.