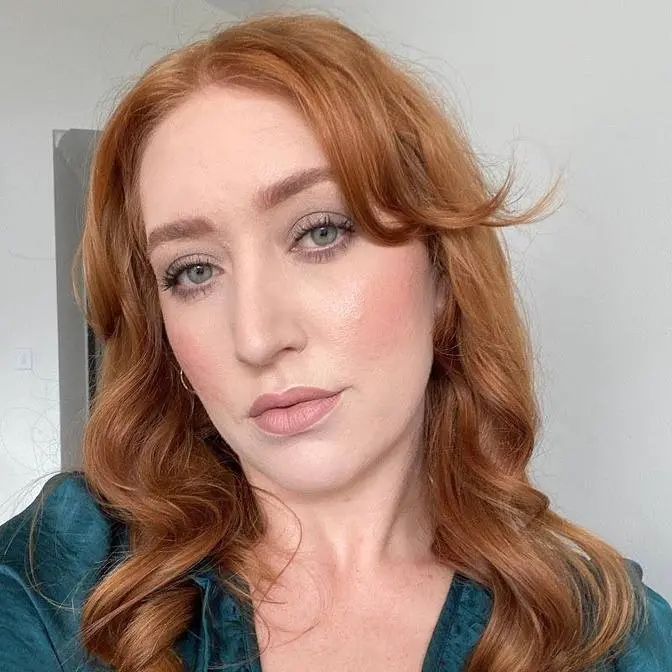
Today I'm sharing how I did my own makeup for my Wedding Day! I go through each step in detail sharing all the products and brushes I used. I am so glad I decided to do my own makeup and am so happy with all the products I used.
P R O D U C T S Mac Strobe Cream in Goldlite Morphe E45 L’oreal Infallible Anti Redness Primer Benefit Professional Primer Australis Colour Clique Green Concealer Morphe E22 Pears Transparent Soap Bar & a spoolie Maybelline Superstay 24 Hour Foundation 03 Ivory (discontinued) Sigma F75 Beauty Blender sponge L’oreal Infaillable More Than Concealer in 322 Ivory Covergirl Clean Fresh Pressed Powder in 120 Fair DB Cosmetics Highlighter Brush Morphe E3 Becca Sunlit Bronzer in Bali Sands Sigma F40 Mac Blush in Cosmic Force Fenty Cheeks Out Blush in Strawberry Drip Sigma F53 Air Contour/Blush Brush Urban Decay Brow Blade Pen in Brown Sugar Morphe M421 Sigma P88 Natasha Denona Glam Palette shades Blend, Smoke & Centre Lid Colourpop That’s Taupe Palette shade Boa Zoeva 227 Sigma E42 Sigma E33 Sigma E15 Sigma E54 Sigma E56 Maybelline Hyper Easy Brush Tip Liner Maybelline The Falsies Lash Lift Waterproof Eylure Lashes Style 117 L’oreal Le Liner Signature Liner Brown Maybelline Colour Sensational Lip Liner in Nude Whisper Huda Beauty Liquid Lipstick in Wifey Mac Lipstick in Blankety Mac Extra Dimension Skin Finish in Double Gleam Morphe E81?? Rimmel Insta Fix & Go Setting Spray L’oreal Shake & Glow Setting Spray
T E C H ‣Music: Music by Ryan Little - Morning Coffee - https://thmatc.co/?l=1441B497 ‣Editing: iMovie ‣Camera: Canon 70D / 18-55mm STM Lens
Hey guys, welcome back to my channel, and if you're new here, my name is Tameka, and
in today's video, I am going to be recreating my wedding makeup look.
Now, I tossed back and forth with the idea of doing my own makeup, but at the end of
the day, I thought I'm going to be too picky, so I'm just going to do it myself, and I am
so glad that I did.
Before the day, I did do a few trials on myself, and I end up writing up everything I was going
to use, and I took this with me so that I kind of had a plan, and I wouldn't forget
any steps, or if I was stressed, I just knew what was going on.
So I'm going to work off this sheet again today, and show you what makeup I used, what
brushes I used, and how I did my makeup for my wedding day.
When I woke up in the morning, I did my normal skincare routine, and just made sure that
my base was really hydrated.
Then I went in with a few different primers.
I started off with the MAC Strobe Cream, and this is in the shade Gold Light.
I didn't want to be extremely dewy, but I wanted to have a little bit of a glow, and
MAC Strobe Cream is the perfect product for that.
I used a small amount of this, and went in with this Morphe E45 brush to blend it out.
Next, I went in with my trusty L'Oreal Infallible Anti-Redness Primer.
If you find you have quite a lot of redness to your skin, and you are super fair, this
is a great primer, as it evens out your skin tone completely.
Therefore, you don't need to apply extra coverage to combat the redness, because this product
does the trick.
Going in with the same brush to apply that.
And then I went in with one last primer, and this is the Benefit Porefessional.
This fills in any enlarged pores really well, and just leaves a beautiful, smooth finish
to the skin.
So just using my finger, I applied this where I have large pores, so on my nose, and on
this area.
I also applied a little bit to my forehead, and my chin.
Next, I did a little bit of colour correcting.
I did have a bit of a pimple on my cheek, I'm pretty sure, so I wanted to make sure
that was covered up.
So I went in with the Astralis Colour Click Green Concealer.
Now this, you only need a small amount of, and I like to use this Morphe E22 brush.
It's actually an eyeshadow brush, but I find it works really well for covering blemishes.
So to show you, I'll cover up this pimple here, and these ones here.
If the blemish is really bad, you can then go over the top with a skin coloured concealer,
otherwise your foundation's fine.
So these ones aren't too bad, and I don't think the one on my wedding day was that bad
either, so just foundation is going to be fine.
The next step was to add a little soap into my brows.
I love the effect of soap brows, I didn't want to go too much on my wedding day, but
the soap definitely does keep them in place a lot better.
So I just went in with a small amount.
I've just got this bar of Pears Transparent Soap, and I just spritz it with a little bit
of a setting spray, and then I just brushed my brow hairs up, trying not to get too much
soap onto my skin, because I find sometimes when I go in with too much, the foundation
sits funny on the soap.
And then using the other end of my spoolie, just to flatten those brow hairs down.
Next I went in with foundation.
Now I prefer to do foundation before eyes, I know a lot of people like to do it the other
way, I've tried the other way, but I just don't like it.
So, foundation first, and I did go in with the Maybelline Superstay 24 Hour Foundation.
Very very sadly this has been discontinued now, but it is amazing, and I'm so sad that
it's gone.
I did get a few backups before it was gone forever, so I'm sorry that I'm even recommending
this, but it's what I used.
The reason that I chose this foundation is because it has really beautiful coverage,
it leaves a satin matte finish, and the longevity is outstanding.
This can stand up to my sweat mustache, so it can stand up to anything.
To apply foundation, I like to spread it over my face first.
So I do that using a concealer brush, this one here is the Sigma, I'm gonna say F75.
Once I've spread it onto my face, I like to blend it out with a sponge.
I like to use the Beauty Blender.
Once I applied that first layer, I did go in and touch up a few more areas.
In total, I used two pumps of foundation.
And here is just a quick close-up of what my skin looks like, I feel like it looks very
smooth and flawless.
See how I've still got a bit of a glow as well?
Next for concealer, I went in with my absolute favorite, the L'Oreal Infallible More Than
Concealer in the shade 322 Ivory.
What I love about the concealer is that it has a fantastic full coverage, it doesn't
feel heavy or cakey under the eyes, and it leaves a beautiful, smooth and flawless finish.
I started with just a little bit in the inner corner, and then blended it out to see how
the coverage was looking.
I didn't want to go too heavy under the eyes, I feel like I went a little bit overboard
with the powder on the day, but what are you gonna do?
Again, I'm using my beauty blender and just lightly tapping to blend that in.
When blending the concealer, I like to stop at the end of my eye here, I don't like to
bring it all the way up, because when I smile and laugh, I do get lines and creases.
And I find that makeup settles quite easily into those lines, so to avoid that, I just
put less makeup there.
Next, I went ahead and set my face using the CoverGirl Clean Fresh Pressed Powder in the
shade 120 Fair.
I chose to go with this powder because the shade is fantastic, it does add a little bit
more coverage, nothing too heavy, but the finish is just so smooth, everything looks
beautiful.
To apply my powder, I used my sponge, because I wanted to really press the powder into the
skin, to make sure I was setting everything in place.
I did go in with a brush for under my eyes as well, this is one by Designer Brains Cosmetics,
it's the highlighter brush.
I like this for under my eyes though, because it is so small and tapered.
Now I do get quite a bit of creasing under my eyes, because I just have a ton of fine
lines, so I did go in with a touch more powder, just to try and get into those lines.
And so this is where I think on the day, I just went a little bit too heavy trying to
get those lines, but when I put my eyeshadow on, I just smoked it out a bit more on the
lower lash line, to kind of hide it anyway.
Then I went in with a powder brush, this one is the Morphe E3, and without any more powder,
I just lightly dusted over the skin, just to make sure that there weren't any missing
patches.
So again, let me turn down the brightness, and you can take a look at my skin.
I think that it just looks so smooth, you can see these fine lines under here, that's
not going anywhere, but they look pretty good.
Next I started working on the cheek product.
So for bronzer, I went in with my Becca Sunlit Bronzer in Barley Sands.
Now Becca has gone out of business, so I'm not sure if they still have products floating
around, but if you can get your hands on this bronzer, do it.
A few months ago I bought a backup, and I'm so glad that I have a nice full one, it's
gonna last me a while, it's just such a beautiful bronzer, a great shade for super fair skin,
and it has a little bit of a sheen, so I didn't want to go with anything too matte, because
I wanted to have that beautiful bridal glow.
And then to apply the bronzer, I went in with my Sigma F40 Large Angled Contour Brush.
I made sure I just went in with little bits at a time, I didn't want to go too hard and
heavy, I just slowly built the product up, and I also made sure to keep the product nice
and high on the cheek, and not bring it down too low.
I also took a little bit up along my hairline, to add that warmth back into my face.
Now I'm not crazy big on contouring, but I did go in with just a touch, and I used this
MAC Blush in the shade Cosmic Force, it's a really beautiful cool toned shade that has
a slightly grey undertone, so it works really well for creating definition on fair skin.
I just went in with the same brush, and just a very tiny amount, and sat it right in the
hollows of my cheeks here.
For blush, I went in with a cream product, and I used the Fenty Cheeks Out Blush in Strawberry
Drip.
Now this blush in the pan looks very, woah, but it doesn't apply like this, it just leaves
a beautiful flush of colour, it's quite sheer, and using this Sigma brush here helps it to
build up really well, and it doesn't disturb any of the makeup underneath.
So this brush is the Sigma F53 Air Contour Blush Brush, and again with the placement,
I tried to keep the blush up nice and high, I did bring it a little bit down into the
apples of my cheeks, but I didn't go overboard.
Well, I try not to.
Small tapping motion to apply this, and again, just building that product up.
I was really happy with the products that I chose, there's nothing that I would have
swapped out, I think that everything lasted really well.
Alright so now that I have most of my base on, I went in with my Rimmel Insta Fix and
Go Setting Spray to lock all of this hard work in place, and also just settle those
powders.
Next I did my brows, and I did trial quite a few different products, and I didn't want
to go too heavy or Instagram-y glam on the brows, I did want them to look quite natural.
So I decided to use my Urban Decay Brow Blade, and this is in the shade Brown Sugar.
Now one side is a pencil, and the other side is a brow pen.
Usually for brow products I use stuff from the drugstore, I don't think you need to go
out and spend the money on a high-end brow product, but the reason that I chose this
one is because the brow pen side is a nice light color, whereas the other brow pens that
I have from the drugstore, so I've got one from Essence, one from Enco Beauty, one from
somewhere else, they're all quite deep.
And I did use those when I did my trial, and my brows were just too much.
So that's the reason that I went with this.
So starting with the brow pencil, I like to draw underneath the brow, fix up the arch
a bit, and then go in with the brow pen to draw in those hair-like strokes.
As you can see, that is a really light color, it works perfectly for me.
I've extended the tail a little bit, and also filled in the front of the brow.
Once my brows were done, I went in again with my L'Oreal Infallible More Than Concealer
and carved out my brows and primed my eyelids ready for shadow.
For this, I have two brushes that I always use.
First is the Morphe M421, which is just a small concealer brush.
And then I go in with the Sigma P88 Precision Flat Angled Brush to blend out the concealer.
I really tried not to get too fixated on different aspects of my makeup, making sure they were
extremely perfect.
Like obviously I wanted it to look good, but for example, I didn't spend 30 minutes trying
to even out my brows.
I got it the best I could and I just left it, because otherwise I could sit there for
30 plus minutes going, I want to fix that one, I want to fix that one, do that one,
do that one.
It's just, I didn't want it to stress me out that much, because I enjoy doing my makeup,
which is why I chose to do it, and I wanted to feel relaxed and happy and not be like,
So once I've carved it out, that's when I go in with the Sigma brush and just tap to
blend out the rest of the concealer.
I like to set my eyelids, so again in with the CoverGirl Powder.
For my eyeshadow, I went in with the Natasha Denona Glam Palette, and one shadow from the
Colourpop, that's Taupe Palette.
Now both of these palettes have cool tones, which is what I preferred for my wedding day.
So starting out with this shade here called Blend, I used my Sieg, no I didn't, I used
my Zoeva 227 brush.
This one, as you can see, has quite a fluffy top, but it is still tapered, so I'm going
to be able to put that colour exactly where I want it without overblending.
So I started by tapping it into the outer V, and then blending it in my crease.
Now when I rest my eyes, you can see my crease here, I tried to bring the shadow up just
above my crease, not too high though, because I don't want it to touch my brow.
So again, just going in with layers of this shadow, and slowly building that up and blending
it out.
I then swapped over to the Sigma E42 brush, and put that same shadow on the lower lash
line.
To make sure the edges were blended, I went in with the Sigma E33 brush.
This is a very tiny blending brush, it's very very fluffy, and this is when I went in with
my Colourpop palette.
And I used this shade here called Boa, which is a very light shade, and just with a little
bit of that, I went over the edges of that first shadow.
I also did the same thing on the lower lash line.
Next I used the same Zoeva brush that I used to apply the first shade, and I took this
deeper brown Smoke from the Natasha Denona Glam palette, and I placed a little bit of
that in the outer corner, and again through the crease, but not blending it up as high.
Then with my Sigma E15 brush, I took that same shade and popped a little bit on the
lower lash line.
And then for my shimmer shade, I took this center lid shade from the Natasha Denona Glam
palette, and I used two different brushes.
I have the Sigma E54 and the Sigma E56.
As you can see, this one here is a little fatter and fluffier, whereas this one's quite
thin and precise.
So using the thin and precise brush to pop that color down, and then using the other
brush with a touch more of the color to blend it into the crease.
Then I went back in with the original Zoeva brush with a little bit more of the two brown
shades, and just tapped that over where the shimmer meets the matte, just to make sure
it's nice and blended.
To finish off my eyes, I went in with a liquid liner by Maybelline.
This is the Hyper Easy Brush Tip Liner, and I just did a very thin line across my lash
line.
Next, I went in with a mascara by Maybelline as well.
The Falsies Lash Lift has been an absolute favorite of mine for a while now, so I went
and picked up the waterproof version because I knew that there'd be a few tears.
And then I went in with the Alua Lashes in the style 117.
Alright, I've just gone ahead and finished the other eye.
While I wait for the lash glue to dry, I'm going to go in with a eyeliner pencil.
This is the L'Oreal Leliner Signature Eyeliner, and I have a brown shade here, and I used
this to tight line.
For me, I find this just makes my lashes look, like, complete.
And then once the lashes are dry, I like to go in with the liquid liner again and just
run over the lash line just to make sure everything's nice and dark, and then I'll go in and tight
line as well.
I did have a bit of a boo-boo before with the eyeliner, and it's a little bit thick
in one area, so I'm just going to take a bit more of that gold shadow.
Well, actually, first I'm going to take some concealer.
Where's the brush I want?
I'm going to take the brush I used to put the concealer on my eyelid with no extra product,
and just try and, like, erase that black line, and then I'll use the gold shadow to go over
it.
Okay, for lips, I went in with a few products, starting out with the Maybelline Color Sensational
Lip Liner in Nude Whisper.
Then I went in with the Huda Beauty Liquid Lipstick in the shade Wifey, which I'm only
just realizing.
And then I went over that with a little bit of MAC Blankety, just in the center of my
lips.
I originally wanted to use MAC Blankety as my lipstick, but then I thought, I'm going
to need something that's going to stay put and last a long time, so that's why I end
up going with the Huda Beauty.
I feel like when you hear liquid lipstick, it's like, oh my god, so drying, so uncomfortable,
but these Huda Beauty ones I really enjoy because they're very thin and they're very
opaque, so you do not need to apply a lot of product.
They dry down pretty quickly and they're really comfortable on the lips.
And then before I went in with highlighter and one last huge dose of setting spray, I
just did a quick check, made sure everything was blended, I was happy with my blush and
my bronzer, my lipstick was neat, my eyes were good.
For highlighter, I used the MAC Extra Dimension Skin Finish in Double Gleam.
This is the most beautiful highlighter.
It just leaves such a wet glass skin look and it's not too metallic, so I thought it
was going to be perfect for the wedding day and I didn't go in with too much either because
I just wanted a nice glow.
So I applied it with my Morphe E, oh, it could be 81, I don't know why these just rub off
so easily, but it's a big, fluffy highlighting brush and just a little bit on my cheeks here.
And then as I said, I finished with some setting spray, so again, the Rimmel Insta Fix and
Go, just a little bit.
And then to have that nice, beautiful sheen to my skin, I went in with the L'Oreal Shake
and Glow.
With this, I just put a little bit on the sides of my face.
Now I didn't do my hair, I did have someone to do that and I have curled it today to try
and get a similar look, but she did do more like glamour waves, which I have no idea how
to do, so look, this is close enough.
These are the earrings that I wore on my wedding day.
I didn't go and buy anything too fancy, these are just from Colette, but the style really
suited my dress.
All right, well, this is it, the finished look for my bridal glam makeup.
I really enjoyed doing my own makeup on the day and I'm glad that I did.
I left myself plenty of time, like more than I knew that I needed, but just in case, I
left myself a big chunk of time so that I was able to just sit down, relax and enjoy
the process.
So if you're thinking of doing your own makeup for your wedding day, I would definitely say
go for it.
Just do a few practice runs at home and give yourself plenty of time.
All right, well, that is all from me.
I hope that you guys enjoyed this tutorial and enjoyed my week of wedding uploads.
I had so much fun editing the vlogs and going over the footage and it just feels really
special to be able to share that with you, so I hope that you enjoyed watching.
If you haven't seen the vlogs or my Q&A, I will have them linked down below and I will
list all the makeup that I used in this tutorial as well.
If you're new here, I would love it if you would take a look around and consider subscribing.
You can also come and follow me over on Instagram.
Otherwise, I hope you're all having a fantastic day and I hope to see you in the next one.
Bye!