
Instructional Video For The Folding Firebox 5" Campfire Stove.
3 Video Views·Oct 27, 2014
Instructional Video For The Folding Firebox 5" Campfire Stove.
Contact us: [email protected]
Purchase products here: https://www.fireboxstove.com/index.php?route=common/home
Let's go ahead and slide the fire sticks out.
Okay, and then we have our ash pan, which is attached to the front of the firebox.
And it's connected really pretty well.
And if you try to use your fingers to pry that off, it's really quite difficult.
But there's a trick.
If you just open the firebox up like a book,
then the ash pan pops off automatically,
which is really handy.
Okay, so we'll go ahead and open this up.
I'm going to turn this around so you can see down into it.
Here on this side, there's the fire grate.
Now this will just hinge down into its position automatically.
So all you have to do is open this up,
allow that fire grate to fall down into its position,
and then it's held into this open position.
And then while I have it in this position,
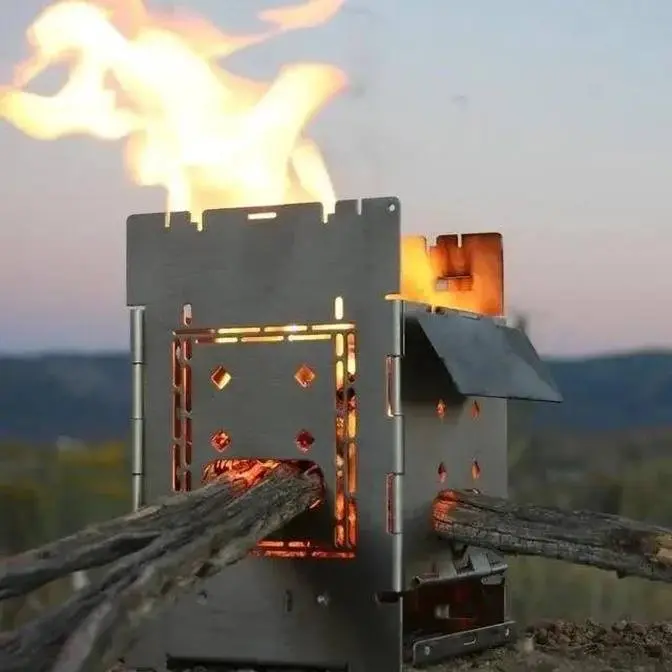
I just wanted you to notice how the firebox is not square.
People expect it to be square,
and I guess in the YouTube videos from the angles that I use, it looks square.
But you can see here that the firebox is not square.
And that's just to accommodate the folding mechanism.
It's kind of got a special way that it folds up.
And two of the sides need to be slightly shorter than the other two
in order for that folding mechanism to work.
Okay, so because it's not square,
that means you have to do things in kind of a specific way.
The ash pan is not square either.
It has a narrow end, a narrow edge, and it has a wide edge.
So the narrow edge needs to go in first.
And then you can see we have our wind damper.
This is the wide side of the firebox.
So you want to put the narrow end of the ash pan in underneath the hinges here
on the same side that the wind damper is on.
And it will just slide right into place.
You want to use the position to close off these holes in the bottom.
There are some small dimples here at the bottom on both sides.
So what you do is you turn your ash pan upside down so the writing is on the top,
and then you slide it in directly underneath those hinges
right up against the fire grate.
And then that ash pan will wedge in there,
and these dimples keep it from falling down.
And what that does is that closes those holes in the bottom of the fire grate.
Now this is really handy if you want to slow your fire down.
You want to decrease the amount of air that comes up through your fire.
And so that will slow your fire down.
And it's also great for using wood pellets.
I will go ahead and close those holes off in the fire grate, put my wood pellets in.
Once the weight is on the fire grate, you can go ahead and pull your ash pan out.
The pellets will stay stable.
Maybe one or two will fall, but not very many.
And then you slide your ash pan into its regular position,
and that will allow air to travel up through your wood pellets
and help it to burn more efficiently.
But if you want them to burn more slowly,
you can just leave your ash pan in that closed position.
You'll see the firebox has some small slots up at the top on both the front and the back.
Now that is to accommodate your fire sticks.
So you take the hook end of the fire stick,
and you put that through those slots,
and that allows you to pick up your firebox.
So once again, like I just mentioned in the caution statement,
that is so you can find more stable footing for the firebox.
Or if you need to adjust it because the wind direction has changed,
and you need these high sides, which are wind-blocking,
you want your wind to be going into these,
so the wind has to travel around the outside of the firebox,
rather than going underneath where your flame is
and blowing the flame out from underneath your pot or your pan.
So if you need to adjust it for the wind,
or find more stable footing for it if it's teetering,
then you can use those to pick up your firebox and adjust it slightly.
Okay, we also have some notches back here in the back.
There's actually four notches in both the front and the back,
and that's to allow you to put these fire sticks across.
You can accommodate a smaller pot or a cup.
You can see I can put this is a very small diameter little pot
that you can put up on there and use without having it fall down in.
And then we have this wider position
that actually puts the fire sticks slightly raised up,
and that allows you to give just a little more stability,
and it raises it up so the heat can kind of travel past these high sides
so that you can accommodate a larger pan or pot a little more effectively that way.
Okay, the other things you can do with these fire sticks
is you can use them to empty your ash pan.
Now we have other places where you can slide the fire sticks through.
There are a series of holes on both sides.
They're diamond-shaped holes,
and the fire sticks will slide through those either horizontally or vertically.
Depending upon what you're doing, you may choose to do it either direction.
But if you slide those through, we have three positions.
We have three positions on this side, another three positions on this side,
and they're offset by a half an inch.
So you basically have from the very bottom of the stove all the way to the top,
you have positions every half inch.
So that gives you a lot of options as far as creating a platform down inside of the firebox.
So once you have that platform, you can accommodate something like a Sterno can or canned heat.
There's a lot of different kind of gel-fueled products on the market,
and those will fit right down in there.
And you just want to put them at the height that gives you the right head space,
and then you can go ahead and put your pot directly on top there.
So that works out very nicely.
Okay, we have some other positions that you can put these fire sticks in,
and they are part of this pattern on the front.
You can see this rectangular pattern.
Now there are slots that are on the inside that are a little bit smaller than the other slots,
and they're right here.
Can you see that slot right there?
That's the slot that I'm going into.
And that is just the perfect height and the perfect width to hold the edges of a transgea alcohol stove.
So if I tip this up so you can see, I'm just going to slide this between those fire sticks,
and then that holds.
See, if I get that at an angle, you'll be able to see that pretty well.
That holds that transgea alcohol stove at just the right height.
So then you go ahead and put your pot up on top, and then that works just beautifully.
Now those slots, or those positions,
there's one, two, three, four, five places you can put the transgea alcohol stove,
or five different heights.
Now let me just show you another position.
I'm just going to put this all the way at the bottom.
So you could just set the transgea alcohol stove right on the floor of the firebox,
but what this does is this holds it in position.
So if your firebox got bumped or whatever else,
your transgea stove is not going to fall or slide to the side or do anything.
That holds it very securely.
So now I'm going to go ahead and show you why you would want another set of fire sticks.
So if you had your alcohol stove maybe down there on the bottom,
what you could do is you could set up your other set of fire sticks,
and in this situation you would want to have them vertical rather than horizontal.
You want them to be vertical so that the heat can travel up past them
so that they don't block the heat.
So now that that's in that position,
you could put your space saver cup or a small pot down in the firebox like that,
and then everything's kind of down in and kind of contained and protected from the wind.
There's just so many different ways that you could set the firebox up
for different cookware, different conditions, different heat sources.
So it really just offers a great deal of versatility.
But now let's incorporate the boil plate.
Now the boil plate and the grill plate, once again, are wedge-shaped.
So you have a wide side and a narrow side.
So you want to make sure the wide side is at the same side as what your wind damper is
because that's the wide side of the firebox.
Now the way you can tell the top from the bottom
is the bottom is going to be kind of really flat
because this is the bottom when it is punched out.
Now the top, the punches that make these holes and shapes,
they come from the top so they kind of round over the edges as they go through.
So that's how you can tell the top from the bottom
is the top will have kind of rounded edges and the bottom is more square and flat.
So the way you would want to put your boil plate in
is this has the little slots in it that your fire sticks can go into.
What I'm noticing is these are a little bit tight.
What happens is we engineer all these fits to be just perfect,
but the material that we make the fire sticks out of,
there's a little bit of variance in the thickness
and so sometimes they come in a thousandths or two thousandths thicker
than what we had planned for.
So if you just put your fire stick in and then just give it a little twist
back and forth just very gently,
that will loosen that up and that will slide right in now.
So that's just a little adjustment that you can kind of do
when you first get your firebox and just kind of tune it in to the way you like it.
So now that's considerably looser.
And then you can hold it with your stick
because you may be doing this when your firebox is hot.
So then on this side there are no cutouts, there are just the tabs.
And on this side there's a little half moon,
let's get this in a place where you can see it,
a little half circle cutout here.
So you want to put this side in first, the one that does not have the cutout,
and then you rest the other side down.
And then you pull your fire stick out.
Normally you'd probably do this with two fire sticks,
but then you use your fire stick, you put it in that half circle shape cutout,
and then you just pry down and that will allow it to go down into position.
And once that's into position it kind of locks in.
Now if your firebox doesn't lock in,
then you just need to put a little pressure,
you just need to adjust these sides so you've got these high sides.
And if they're too far out that your accessory plates don't snap in tightly,
so they should actually snap in.
So if they're not tight enough to snap in,
then just gently put a little bit of pressure
and just adjust those in until you get the right amount of pressure that you like.
So just adjust those in a little bit.
This is just another adjustment that you can do yourself at home.
So like I said before, you want to put in the side that doesn't have the half cutout first,
and then use your other fire stick to stabilize it.
You can kind of hold it down with that until you pull out this fire stick,
and then slide this fire stick into that half circle cutout,
and then just pry it down and it pops into position.
Okay, so now that your boil plate is into position,
you can go ahead and slide these fire sticks through that position that I had them in before.
And then now you can go ahead and slide a cup in and then use it that way.
Then now you're completely boxed in.
You can see how you're just completely boxed in,
and then all of the heat has to exhaust out the front here.
So it becomes a very efficient little boiling system,
which is for the Esbit tablets or the Coghlan solid fuel tablets.
Any of those hexamine tablets will work.
So what you want to do for this is I'm going to try to put this in a position where you can see
on the side that has the wind damper there are slots directly below it.
You want to put your fire sticks through those slots and then down in the slots in the front.
Now if the slots in the front, once again, if they're just a little bit tighter than what you would like them to be,
put your fire stick in and then just twist it both directions,
and that will just open that up slightly to create the perfect fit.
Okay, so I'm going to go ahead and slide these into that position.
Go right there with the wind damper up, okay?
Then I'm going to slide my ash pan out.
Once again, you don't want to slide it from the front because it won't come out the front.
You want to slide it from the back, the same side that has the wind damper.
Slide it out the back, and then you want to slide this in right on top of those fire sticks.
Now if you're in a condition where there's no wind, no breeze,
it's just really a calm day, then I would put your tablet right in the center.
Hot would sit right up on top, and then your heat would flow both directions and exhaust out both sides.
Now if it is a windy day, then what I would recommend you do is slide the ash pan forward
until you create an air gap at the back.
Okay, then you close the wind damper, and so then you can still see that there's...
Let me try to get this at an angle.
Okay, you can still see that there is about a quarter of an inch gap here.
That allows combustion air to come up from the bottom,
and then what you do is you set it up with your fuel tablets right at the very back edge.
So your combustion air comes up from the bottom, and then it ignites with the fuel
and then travels along the bottom of your pot out the front and exhausts out the front.
So the heat has to travel a nice long distance against the bottom of your pot.
And what that does is that completely shields...
Your whole combustion area is shielded from the heat.
The only open area is where it's actually exhausting.
So you can set this up at an angle where the wind will actually work as your friend
and pull that exhaust out of the firebox rather than disrupt the flame underneath your pot.
So as a solid fuel tablet stove, the firebox is absolutely fantastic with this wind condition setup.
It's very effective.
It works better than a windscreen with an as-bit stove.
Let me show you the standard position for the boil plate.
So you would keep these firesticks in the position that they were just in,
with them going underneath the wind damper but yet on top of this lower level of the firebox.
And then you put your boil plate in.
And then this is the right height for your ollie camp cup to sit down in.
And then the handles are not bumping.
It's a perfect distance for your ollie camp cup to sit right down in there.
And then once again, the whole thing is boxed in now to where you can do this with a wood fire
and just feed in the tiniest little twigs and sticks and just have this little micro-efficient little stove there
to boil your water in your ollie camp cup.
And then once again, if you have a bigger fire in there,
you can open up your wind damper and allow it to exhaust out both sides,
depending upon how much air your fire needs.
You can just kind of adjust that as you go.
So that's a great position.
The half-moon cutout, just like the boil plate.
So you want to set that into position and then use your fire sticks to pry that down
until that snaps into position.
Okay, so there's your grill plate in position.
Once again, it's all boxed in so you can build up a nice big bed of hot coals inside the firebox
and then just cook with the hot coals.
And in that situation, you'd want to have your wind damper closed
to just really contain the heat up underneath your grill.
And that's a very effective way to cook.
And let me show you one other position that's a little bit less obvious.
And the best way to put it into this position is to maybe put your grill,
have your grill kind of somewhere where you can see how it's going to need to set in there.
And then you take your ash pan and you do it with the riding faced up.
You slide that over your grill plate.
Okay, so now they're kind of connected together.
You can see that these little dimples on the sides will hold that in that position.
It can still slide back and forth.
But then you can go ahead and snap this in.
And this you'd probably want to do while it's cold because you don't have access to that half-moon shape.
So you want to put it into this position before the firebox gets real hot
or it will be very difficult to put it into this position.
Okay, now with this on top, you can use this as a little hot griddle
to make grilled cheese sandwiches or whatever else.
This just gives you a little flat cooking surface that you can use.
And then also with it in this position, you can turn the whole firebox upside down.
Okay, push the fire grate down so it's just laying against the side now.
And then I tell people that it's best to do this with the firebox raised up a little bit.
So I'm going to go ahead and raise it up a little bit.
I have this box, you know, but you'd want to use a rock or something.
And what this does is, okay, now you have your wind damper on this side.
Okay, and you have your opening on this side.
Okay, so what you do is you can open your wind damper or close it to create ventilation for your fire.
And then I don't have long sticks to show you.
All I have are these short little sticks.
But you'd want to feed your sticks in from the bottom.
So this becomes a rocket stove.
This becomes a side feed rocket stove that's really efficient.
So the reason you want it raised up just a little bit is you want your sticks to go in at a little bit of an angle.
So when they come in, you want the ends of the sticks to be just above your wind damper, the opening for your wind damper.
Okay, so that way the air can come in.
That's your combustion air will come in right below the fire.
And you'll have a very efficient little fire inside the firebox.
And that's its rocket stove position.
Your boil plate will still fit right up on top in this position.
So you can still use it in conjunction with your accessory plates.
So you put that in that position.
You know, maybe put your fire sticks in this position.
And then you could slide in a 40-ounce stainless steel water bottle.
Or I have this deeper cup here.
It will slide all the way down in there.
And then it exhausts out both sides here.
So that's the rocket stove position.
So you just lift that off and slide out these fire sticks.
Okay, let's go ahead and turn this over.
Take the grill plate off.
There's your ash pan.
So now that when you're all finished and your firebox is cooled down to where you can handle it,
then you just reach in.
See, here's the ash or the wind damper side.
So you just put your hands underneath and push up the fire grate.
Okay, once that's pushed up, then the whole firebox will collapse and then fold again.
Okay, you want to close your wind damper.
Now the nice thing about this is all of your dirty sides have now been folded into the interior.
All these outside edges are the clean side.
So this inside edge would be sooty and a little bit messy,
but you have this wind damper you can close to cover that up.
Okay, then when you put your ash pan on, you just need to line it up with the hinges.
Okay, so the edges of the ash pan need to be lined up with the hinges.
That's a very specific place that the ash pan needs to go in order to fit.
You can see when you slide it up and down, it's locked into that position.
And then snap this side in.
Once that's in position, you just slide your fire sticks down through.
Snap those into place.
You want to make sure your wind damper is closed because these hook around
and they hold your wind damper closed as well as they hold the whole firebox in its closed position
so it cannot open like a book.
So there's your other fire stick, and then it's ready to go into its bag or into your pack.