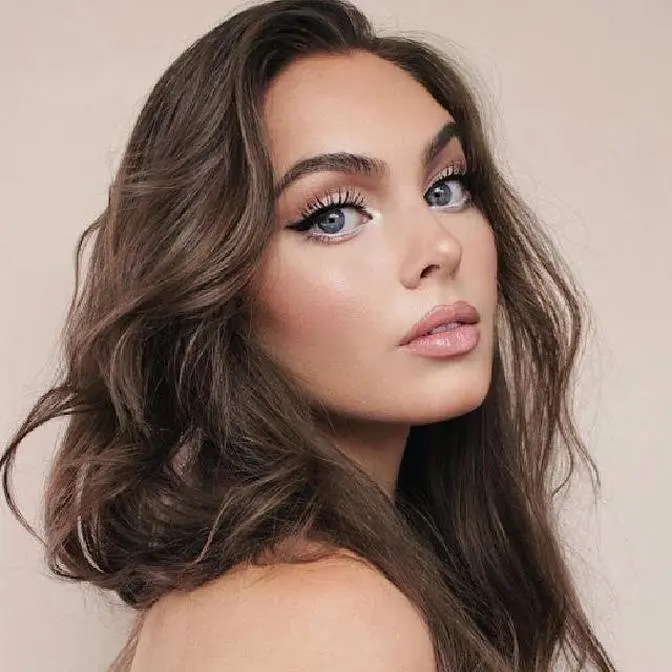
Hey it's jackie wyers & welcome back to my channel for this KENDALL JENNER Makeup Tutorial | Kendall x Kylie Cosmetics Review! Thumbs up if you enjoy this sexy, supermodel glam with a couple foxy eye tricks and a full demo and review of the Kendall x Kylie collection. I almost never do reviews- let me know how I did :) Get the KENDALL look with the products linked below!
ps sorry DEFINITELY if my filler word in this video
Kylie Cosmetics KENDALL FACE STICK TRIO https://shop-links.co/1720094579789412380 ...The trio is nice for everyday makeup if you like a barely there look - I prefer powders for more of a punch of colour, depends on what you like. The blush was my favourite out of the 3.
Revlon ColorStay Brow Pencil (Soft Black) https://shop-links.co/1720094583487981173 This I demonstrated so poorly, the product was a bit too soft because it was so dang hot and humid in my apartment so i didn't get precise brow strokes and it got a little messy looking. It's one of my fav product though I used it in the Lily Collins Met Gala look and loved the turn out! https://bit.ly/3hkTM9R
great for oily skin and summer! Will keep this on hand when I'm filming tutorials and in my purse
Kylie Cosmetics SISTER SISTER | LIP BLUSH KIT https://shop-links.co/1720094586738807454 MY NUMBER ONE PICK: an amazing lip combo that is light on the lips, stays put and a gorgeous blush mauve that Kendall often wears and I love the smell of the product.
Kylie Cosmetics CAN I BORROW THAT? | HIGH GLOSS https://shop-links.co/1720094588378470883 I loved the High Gloss as well, really smooth and looks incredible with the lip kit. Too much product and it can be weighed down (my bottom lip is quite bottom heavy so it did drip down and I know to use less - regardless it is one of my fav glosses ever!)
Hope this review is helpful and if you want to know when/if there is a re-stock, you can get more info on thekyliejenner.com or socials. If it doesn't restock I think my final thoughts are that the lip kits are a must have!
h a i r p r o d u c t s
I blended the front of my hair with the L'Oreal Colorista Spray in Black into this wig: Dark Brown with Highlights Long Wavy Lace Front Wig - Duchess Series LDSAF11 https://shop-links.co/1720094589164936538
To get lots of volume for the picture I made my hair defy gravity with the OGX Bodifying + Bamboo Fiber Full Big Hairspray, in the video so it wasn't as stiff I used the OGX Argan Oil Of Morocco hairspray which is a lighter hold. OGX Bodifying + Fiber Full Big Hair Spray https://shop-links.co/1720094590433164989 OGX Renewing Argan Oil Of Morocco Penetrating Oil https://shop-links.co/1720094590955643416
Disclaimer: Not sponsored. After the requests for a Kendall look I purchased the collection to create a themed video. Some of the products listed links are affiliated!
if you are reading this... comment, “YOU'RE CUTE JEANS”
Hey, it's Jackie, and welcome back to my channel for another celebrity-inspired makeup tutorial.
In my tutorial I did that was inspired by Bella Hadid for Foxy Eyes on Brown Eyes,
I showed a picture that I did from a tutorial of Kendall Jenner that I deleted.
A lot of you have been asking for the tutorial, and I explained in that video
that I just didn't really like how the look turned out.
So in that time that I deleted it and many requests came in for a Kendall look,
the Kendall and Kylie collection came out from Kylie Cosmetics,
and I have not tried Kylie Cosmetics just in general.
So I thought it would be fun to buy the whole collection
and then let you guys know what worked for me,
what products that I would rebuy from the brand,
and also, you know, show you how to get makeup inspired by Kendall Jenner.
So if you enjoyed this and had fun, you know, becoming a Jenner with me today,
make sure you give this a thumbs up and subscribe for more videos like it,
and let's get into it.
I already have my darker wig on and I've applied foundation.
Kendall's skin tone in these pictures were a little bit tricky to match,
so I did it off-camera, and then to start the transformation,
I've popped in some brown contacts.
I only wear colored contacts for pictures or videos,
so I don't really promote them because it's always a risk to put anything in your eye,
but let me know if you guys think these ones look natural
because I have worn some pretty bad ones on this channel,
and I think these ones are quite good and not distracting, so let me know.
And I love this photo shoot.
Here's the first look at the packaging for the Kendall Face Stick Trio.
The bronzer stick is called Act Natural, and it's a cool taupe shade.
It's supposed to bring warmth to the skin.
I like my all-over bronzer to be a bit warmer than this on my skin tone,
and layering the shade too much for, like, a full snatch contour
becomes a bit, like, ashy and muddy.
So I like this on very sheer foundation for a no-makeup makeup type of contour.
Really great in-person makeup, but if you want to go for more color
and more of a snatched Instagram type of look,
like this photo shoot that I'm trying to recreate,
I definitely recommend powder because you can add more depth with less product.
So I'm going to show you guys how this blends out
because it does look really nice, but since I'm going more extreme,
I'm going over it with a powder bronzer.
Overall, this product is easy to blend and looks natural on the skin,
but for the work it took to blend,
I could have got a stronger result with powder in less time,
so it definitely depends on what you like.
Moving on, I'm adding concealer to highlight my chin, by my nose,
under my eyes, and down the sides of my nose,
as well as jawline and above the brow.
This will help make the contour pop.
And here, I tried to build up the bronzer stick one more time,
but you can see, adding too much product, it did start to look a bit dirty on me.
But the second stick is the blush stick in Runaway, a warm rose,
and I had better luck with this one.
I really love it, and I've worn it all week.
It's a sheer, satin, buildable blush that provides immediate, natural finish.
That's how it's described.
And you can use this on the lips as well.
I think it has a really nice sheen to it.
On camera though, same thing.
I am going to add a similar MAC blush for more of a pop,
so it, like, shows more.
But I love this for in-person makeup, again.
So my review is, I like the sticks for every day on sheer makeup,
but to get the look I'm going for, I brought in more powder.
And time for a Kendall-inspired nose contour.
With the tiny brush, this one's from Charlotte Tilbury,
I'm pinching in between the brows for a higher and slimmer nose bridge up top.
And I'm using an ashier brown shadow from another palette.
And then I'm creating a wider base,
tapering down in a similar shape to this photo of Kendall.
From the shoot, you can really see how her nose is contoured,
so I'm replicating that as best as I can on my own shape and blending as I go.
This will look funny until the end of the makeup,
before everything is balancing it out.
But I love creating a shadow above the nose tip
and then adding some little divots at the tip for more structure.
And I even added a bit of shadow under my nose to make it appear slightly longer.
I feel like I gotta disclaim this, but I recreate contours for a challenge, for fun.
I don't go out with my face contoured as different people.
I don't really recommend it for every day at all.
But if you do take some of these tips and tricks
to snatch your own features with a lighter hand,
it can really look good, especially in photography.
Finally, the Spotlight Highlight Stick from the Trio.
This is an icy champagne, and I liked it.
My all-time favorite highlighter is by Charlotte Tilbury,
and it's also called Spotlight, and I do prefer the texture of that one,
but it is really expensive.
So for $42 to get all three sticks,
I thought this was a pretty good deal, and I'll be using them again,
but for more natural, over-glam looks, like I've been saying.
And I'm gonna deepen up my brows and try to straighten them a bit.
I have wider, thicker brows, so my first attempt got a little messy.
But the second brow, I used a lighter hand
and faded in the front of the brow with a couple small strokes,
and then brushed the hair across and then up
to give the tail a bit more of a straight Kendall vibe
without plucking any of my brows off.
I follow Mary Phillips on Instagram,
and she's the makeup artist for Kendall a lot of the time,
and did the makeup for the shoot.
So she used the shade Model Energy.
I started that on the brow bone.
Then I'm assuming Cup of Tea, a matte medium brown,
and I used this through my own crease.
Slightly onto my lid to tone it down
because my eyes are quite round and a little more deep-set.
I really like the lightest shade for, like, an eraser type of shadow.
If you make a bit of a mistake with a slightly darker shadow,
you can blend the cream over top and diffuse it,
so I'm doing that with the nose contour.
Starting to deepen it up with Burnett's Do It Better,
which is a matte, cool-toned brown.
Taking this through the inner portion of the lid and crease,
and on the outer V, I faded upwards into that wing.
I read from the post I'm Telling Mom was used.
Maybe that was under the lash line,
but I went with the same Burnett's Do It Better
to smoke it out and add that almond shape.
I thought the deeper shade might help bring out
more of an almond shape to my super round eyes.
Overall, the shadows were super easy to work with.
I'll show you in a little bit some of the really fun colors
quickly to the eye.
And to finish off the look, I'm using my all-time favorite eyeliner.
Super easy control, especially when creating a very thin line.
So as you can see, I've applied it to the very inner corner,
and then before I reach the outer corner of the eye,
I'm going to taper it up and out into a wing,
leaving a gap to lift the eye upward and outward,
and just check out the difference this little step gives.
Next product is the Translucent Blotting Powder.
This is used for final touch-ups to eliminate the look of shine,
and it's pretty cool.
It's a velvety gel powder, and you just tap the pad into it
and then press it over your skin.
It's also great if you have a pesky pimple,
like I have a tiny one forming on my cheek,
and as soon as I blotted it, it's hard to see
because it doesn't pick up the light anymore.
One of my favorite mascaras is the Benefit Bad Gal Bang,
and with this glam look, I'm not going to use falsies,
but a thin layer of mascara, fanning the lashes outwards,
and the bottom lashes, I'm pushing them upwards, if you can tell.
This does give a slight illusion of more foxy-like eyes
by bringing the volume up rather than downward,
which would just accentuate the roundness
and kind of bring the eyes down.
I love this makeup look, and before I move on to the lips,
I wanted to show three of my favorite other shades from the palette,
and I'm definitely going to do another look with these green shades
and mix in some browns on Instagram,
so follow me if you want to see more looks with this palette.
I think the palette really does capture some of Kendall's most iconic looks,
and the bright shades are really pigmented,
so I'm impressed by the eyeshadows.
And for the lip kit, I surprisingly have never tried a Kylie lip kit,
and I'm really obsessed with this shade.
It's the Sister Sister Lip Blush Kit.
It's a perfect rosy, oh my god, mauve or mauve?
Why do I always mess that up?
Anyway, for the Kendall-inspired lip look,
we're going to create a stronger V-shape.
I love the texture of this ultra-creamy wash of color.
It isn't drying, and it stays put.
It reminds me of one of my favorite K-beauty products that's on screen,
but the K-beauty product doesn't dry down, so it transfers,
and this one doesn't, which is awesome.
And under a mask, I wore it all day, it didn't transfer.
And we have two more Kendall products.
I really love from the collection the Can I Borrow That High Gloss.
It's a sheer berry color, very glossy, adds shine without being really sticky,
but stays in place and lasts a long time.
And in the current state of the world, I mean,
gloss isn't the most practical thing with masks,
but if you are a gloss girl, then this one is pretty awesome.
Final product is the Everything Everywhere Gloss.
This is described as a versatile shimmering face gloss
that creates high shine for a glass-like effect.
And it's probably my least favorite from the collection
in terms of a practical product, but if you're a makeup artist
or you're just experimenting with makeup and you're looking for something
that you can kind of do more editorial looks to play with,
then this one's pretty cool.
It has a shimmering copper, hot pink, and rose gold shift to it.
And there's the completed Kendall glam-inspired look using the collection.
I hope you got some Kendall makeup tips and tricks and a good review.
I, like, never do reviews, so let me know what you thought.
And the wig is from Pose Wigs.
It's the same one I used in the Aria Montgomery tutorial I did,
Bella Hadid tutorial.
And, yeah, I'm just adding some volume up top, kind of finessing it a bit
and adding some hairspray.
And it always takes me so long to get a good shot to do, like, a recreation.
That's the completed look.
And this awesome top, similar to Kendall, is from Verge Girl,
which is my favorite online site right now.
For my little rundown of my top products from this collection,
I kind of already let you know as I was going through the video,
I will for sure buy a lip kit again.
I love the feel of these products, and I'm so late to the game.
I did also really love the gloss.
It smells amazing.
But if you use too much, I do find it drips down.
So use this with a light hand.
But I love this color combo.
The next product that I did really enjoy is the translucent powder,
the balding powder.
I think this is great for summer.
The middle product for me is the eyeshadow palette because of this texture
and the, like, cream shade.
I just know it's going to get so dirty with my makeup.
It won't look that nice very long.
But I do love these shades, especially the fun colors.
I think this is very Kendall.
I love her in green eyeshadow, so I'm excited to wear that more.
And then the least favorite products of the collection, the Everything Everywhere gloss.
I wouldn't rebuy.
It's cool that I have it in my kit because I think it does make really cool,
like, pictures if you really gloss yourself up.
But it is pretty sticky and not the most comfortable thing to wear.
And then the sticks, I'm just not a huge fan of cream products,
as I talked about in the video.
So there's nothing wrong with it.
If you like cream products, you'll probably really like these.
But not for me.
And the one I would rebuy was the runaway blush stick.
I thought it was really pretty and had a nice sheen to it.
So there's my rundown.
I adore the packaging.
I so wish that the photo was, like, printed on the palette.
Maybe that would be tacky.
I don't know.
But I'm just sad that I'm going to get rid of the boxes that have such beautiful images.
So I might keep them.
But anyway, hopefully this was helpful.
And if you enjoyed it, make sure you give it a thumbs up and subscribe for more like it.
I love it when you guys tag me in your photos on Instagram
if you try out any tips from these tutorials.
I love to feature you.
And if you have any requests, be sure to leave them down below.
And I will see you in my next one.
Bye, guys.