As of April 24th at 8 am MST, SUMO System and related product Orders are Being Accepted! (full disclosure) We are a very small manufacturing operation here in the USA, and we are producing all of these new parts in-house. We have done our best to prepare for a large volume of orders; however, we are also committed to only shipping first-rate products, and quality takes time. Since the SUMO System upgrades an already very popular stove that has a large fan base, we expect at some point to become overwhelmed. We plan on keeping our heads down and getting orders shipped out systematically as they are received, without losing sight of our number one priority, which is to only send premium quality products. If we fall more than a week behind, we will contact you via email to let you know what to expect (happy to refund orders at any time). Please be patient with us, knowing that we are making our very best efforts to keep you, our beloved customers, over the moon happy with both our products and our service. If we get too far behind, we reserve the right to stop accepting orders until we have a chance to catch up.
Customer service is open between 7 am and 1 pm MST Monday - Friday for phone calls and the online chat. Our voicemail accepts messages when you call outside those hours. Please leave a message or send an email to [email protected] with any questions, and we will respond as soon as possible.
These two links are how you get the best deal The "check box" items are discounted and the "Everything Kit" Is priced to show thanks for you wanting the whole SUMO experience. :)
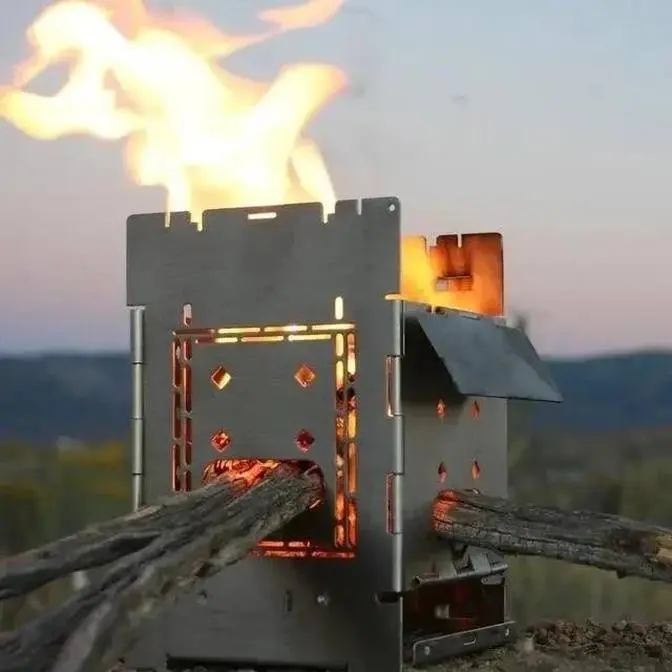
The New Firebox SUMO Wide Stance System for the classic 5"G2 Original Folding Campfire Stove is a game changer! The SUMO Brackets increase stability so side workstations can be configured to accomplish most any cooking task. Set up a GRILL, OVEN or POT-STAND above one of our NEW Side Car Coal Trays then load it up with hot coals harvested from the main burn chamber. Now that you have a heat source you can bake, barbecue, or use as a stovetop. Set up either side for custom cooking while also utilizing the heat coming from the center. Our New Hang-Over Sticks can be set at three different heights which make the set up possibilities almost endless. As if that's not enough, you can also broil underneath the main burn chamber at two different heights. Install the ash pan upside down and you have a toaster! Remove the ash pan altogether and you have enough space to broil a thick cut steak or a few drum sticks. These simple to use accessories make the Best Bushcraft Stove into a camp kitchen power house. Gone are the days of cooking one thing after the other, trying to keep everything warm. Now you can be boiling your potatoes, while also baking bread and broiling your cowboy cut steak. All at the same time!
The SUMO Wide Stance System only exists because the original G2 5" Firebox Stove inspires so much creative thinking! Since its introduction more than 15 years ago, fans have become intrigued with finding creative new ways to use and enjoy its amazing versatility. Although the original development of the 5-inch Firebox Stove was a group effort, Steven Despain was responsible for the majority of its form and function. That's me, & honestly, I didn't realize half of what the 5-inch Firebox Stove could do until I gained some experience with it. Slowly, the seemingly simple design began to reveal little gems of usefulness. I often refer to the 5-inch Firebox as the gift that keeps on giving. It took on a life of its own! Even after all these years, easter eggs of versatility are still being discovered! It consistently rewards creative thinking. When you try new ideas, they almost always work as if the idea had already been considered and planned for. This added depth of character brings a whole new aspect to the enjoyment that can be had cooking with what many consider to be the king of "Bushcraft" or "Campfire" style stoves! The SUMO Wide Stance Stove Expansion System simply takes creative cooking outdoors to the next level! SUMO is a huge leap forward in the G2 5-inch Firebox Stove's ongoing evolution.
I am both very excited and happy to announce the official launch of the Sumo Stove Expansion
System.
This new Sumo System is an absolute game changer for the 5-inch firebox stove.
Not only does it expand your work area, because now you can set up a workstation on both sides
of your firebox stove, but it also changes how you use your firebox stove.
You can now produce hot coals in your center area, harvest those hot coals to use them
on both side workstations, and then you have a perfect place for grilling, for baking,
a warming station, and you can also use the space underneath the main part of your stove
to broil.
It gives you so much versatility that you're going to absolutely have a ball using your
new Sumo System with your original 5-inch firebox stove.
I'm going to give you tips and tricks and pointers, things I've learned as I've been
experimenting that will help you get the most of your new Sumo System upgrade.
Almost all of the parts of the Sumo System have more than one use.
This lid for the hard case is also a heat shield.
The bottom portion is made out of thicker material so that it can be used as a griddle.
But let me show you how I have things arranged in here.
We've got the 5-inch firebox, and I have the Sumo stands crossed and in the bottom of the
Sumo case.
Now this bigger V area is a great place to put your hinge here on the back of your 5-inch
firebox stove.
Just makes everything fit in there in a nice, neat, organized way.
Let's go ahead and take the stove out.
I'm going to go ahead and open the stove up.
We'll just set the stove up here real quick, and I just want to give you some tips about
putting your Sumo brackets in position.
So first you'll have to get your T-bracket lined up with your slot, and then that will
slide there.
Now this whole piece of material needs to flex upwards in order for the T-bracket to
rotate.
So if you push upwards while rotating, it just makes it a little bit easier to get that
T-bracket rotated around.
Because of that spring tension, like I say, because that does have to spring upwards,
that keeps it nice and snug.
It's actually a very good system.
Your heat shield slides down below, and it offers additional protection to the surface
that your stove is on.
This area below the main burn chamber of your stove can be used for broiling.
If you leave your ash pan out, you have plenty of room for a thick-cut steak, or you can
put your ash pan in upside down.
You slide it in, and then you push it down, and then that gives you the perfect place
to slide a piece of toast or an English muffin.
Hoo-hoo-hoo.
That looks nice.
Perfect.
So you have two height positions for broiling.
Good morning.
We had a big windstorm come into town, so I had to move into the warehouse.
It's about 4.30 this morning.
I've got a lot of stuff to cover, so I'm going to get to work.
When I did my initial test on broiling, I had some hot coals fall through onto my food.
What I found to remedy that problem was to put the adjustable fire grate down in the
bottom right on top of your regular fire grate.
And that seems to work great.
When I did toast my English muffins, they came out with no ash, no hot coals.
They were perfectly clean.
When using my griddle, I found it was pretty easy for it to slide over far enough to slip
off one of these edges.
The best solution for that is using your fire sticks on this shallow notch.
So that holds your pan slightly above these edges, and it makes it so that it cannot slide
off.
And this allows a little air space so some heat can flow to these edges of your griddle
as well.
When it comes to using your sidecar coal tray, I had assumed that they would all fit in a
similar way.
But I decided I better test it out, and boy, I'm sure glad that I did.
Because I found that there is a different fit on almost all the stoves.
This is a Made in USA brand new stainless steel stove, and you can see it fits in there
really easily.
But if you go in on this side, you have to flex it just a little bit to get it all the
way in.
So the moral of the story is, you need to get things set up before you start your fire.
Here's an older stove, I think this one is imported, in fact I know it is.
And it doesn't go in either side real easily.
You have to put one side in, flex it just a little bit, and then push it in.
You do want to set your coal trays up before you start your fire.
Because once everything's hot, you're not going to be able to get this stuff into position.
Let's review using the hangover sticks.
I think storing the hangover sticks in your airbag pan is great.
It's like a little drawer, and it just keeps them contained and all in one space.
The hangover sticks can be attached with the wind damper closed like it is now, but they
actually have a little notch on them to accommodate the wind damper if you do open it.
Let me show you how it works with the high-low fire sticks.
They slide in the same notch just as easily, but then you can also put them in with your
wind damper open.
There's a little half-moon cutout, and that's to accommodate this wind damper.
So you go in, and then you can slide it down, so that way you can have your wind damper
open with these high-low fire sticks in their high position.
You just have to remember that you need to use that little half-moon cutout.
Now you can also put these in.
See that wind damper needs to be at just a slightly upwards angle, but you can also just
put them in like this, and then you have your high-low fire sticks set up over where they
would be a little more blocked from the heat because you do have this wind damper closed
at this point.
So they do work with the wind damper open or the wind damper closed.
There isn't really a lot to say about using the grill.
It's pretty basic.
Other than a lot of people would like to see the grill attached somehow, they don't like
the idea that you have to hold on to it.
If you need to turn your piece of meat or whatever it is you're grilling, you have to
hold your grill so that when you grab your meat and lift it, if it's sticking, it doesn't
lift the whole grill.
This is a titanium grill, and it's very lightweight.
But I need to remind people that the whole system is relatively lightweight, and if it
were attached, there would be a possibility that you could lift the whole system.
And having it loose like this makes it so you can move it to different heat zones depending
upon the progress of your project.
And one thing that you may be able to do, depending upon how tightly your ash pan fits,
is you may be able to remove your ash pan and then slide your grill in.
You would want to have your meat at the end of your grill, but you could slide it in under
your broiler, let it broil for a few minutes, and then pull it out.
And then maybe you set it up somewhere where it finishes at a much lower temperature.
But having the grill be loose makes it so you have options.
Let's set up the oven.
When you get your windscreen, you'll need to divide it up into three pieces.
It does come with a little carry case, which is nice.
But what you'll need to do is divide out four sections, and then you use this removable
pin to push the pin out.
Okay, so set your pin aside.
Then you have a section of four segments, and then I'm going to do another one that
is six segments.
Slide that hinge pin out, and then you have this extra piece that you can add to another
windscreen if you would like.
Let's put our airbake pan into its position.
The airbake pan is a game-changer for this oven system.
When you put your four panels of windscreen into its position, you want to have this hinge
curl on the back side.
You don't want it bumping inwards.
You want it bumping outwards.
You need to have about a quarter of an inch of an air gap.
I would say a minimum of a quarter of an inch air gap behind your airbake pan.
That will allow the heat to flow upwards, and then around and over the top.
Let's put our section of six segments into its position, and this needs to be oriented
the same way.
You want your hinge curl to be bumping outwards, not inwards.
Then you can push everything tucked right up close to the sides, but once again you
want to make sure you maintain that air gap.
The tin box that your oven kit comes in becomes the oven lid or the oven door.
Now you have this little bracket that slides into these slots, and those fit in front of
your windscreen panels, and they just ensure that your oven door or oven lid remains in place.
You can use a little rock or a little pebble on either side of your oven to hold these
from flapping open, especially if there's a breeze.
Then you can also put a rock back in the back.
This is the higher oven position, so this would be the right height for dinner rolls,
biscuits, or cinnamon rolls.
Ooh, beautiful.
Cinnamon rolls are done.
But if you wanted to bake a loaf of bread, you would need to set up with the high-low
fire sticks in their low position.
So we'll take these off, and we'll move these over.
I'm going to put these in the low position.
Put this air bake pan down here, and we'll move these back into place.
Now we have two loaf pans.
We have a small loaf pan and then a little bit of a larger loaf pan.
So let's just see if the larger one will actually fit.
I think it will fit, but it's very tight.
Once again, you want to make sure you have that air gap, or we do have this smaller loaf
pan, which may make a little more sense, to be honest.
That other one really maximizes the space, but you could really make a nice banana bread
or even just a regular loaf of bread in that smaller pan as well.
There we go.
Ooh, look at that cornbread.
Holy smokes, did that turn out perfect or what?
Alright, when it comes to coal production and having coals that you can harvest to put
into your coal trays, I used to think of it as a continuous, like you would be producing
hot coals continuously, but that doesn't really work because what happens is the coals get
smaller and smaller, and if they get too small, they're really not very usable.
So I've changed my thinking into more of batches of hot coals.
So I would build up your fire pretty big, let it burn to hot coals as soon as that flame
is about to go out, start harvesting the coals while they're at their biggest size, and then
don't use all the coals, leave a little bit in the bottom so that you can stoke up another
batch of coals.
So I think that thinking of the coals in batches makes more sense.
Let's review some of the accessories you may want to consider.
We have these extra long stainless steel tongs.
These are very lightweight, but the handle is long.
Perfect for reaching in, grabbing coals, and moving them to your coal trays.
You'll also need a pot gripper if you don't already have one.
We have these in a long handle version and a short handle version.
Honestly, I only use the long handle version myself.
But this is what you'll need to handle your griddle.
Your hard case sumo accessory kit will come in a cotton ditty bag, which makes sense.
You know, you're using the bottom as a griddle.
It's going to get a little bit messy.
I do recommend that when you're finished using your griddle, that you just wipe the bottom
down with a paper towel, and that will get rid of all of the loose soot, the messiest
stuff.
But then the whole thing can slide into your cotton ditty bag.
Now, we do have a premium leather bag.
So once again, this cotton ditty bag will come with it.
But we do have a really nice premium top grain leather vertical case for your sumo accessory
kit.
And that slides in.
Your regular firebox cases, they won't fit this new hard case.
In fact, I'm not sure how well.
This is going to fit with this cotton bag.
We kind of designed it to work without the cotton bag.
But I just realized somebody might really like having it in the cotton bag, just to
keep their leather case nice, because these leather cases are just so beautiful.
This leather case is brand new.
It's very stiff.
It hasn't been broken in at all.
Yeah, it's very thick, very sturdy, beautiful leather.
But you can see that leather case is just very handsome, very nice.
Would make a very nice gift for somebody.
Last but not least, if you want to use the broiler, you'll want to have an adjustable
fire grate.
If you don't already have one, make sure you pick up one of these.
This will block the hot coals from dropping in on your food when you're broiling down
underneath.
The last accessory that I can think of that you may want to consider would be this table.
This is a very nice platform for using the sumo system.
Let's turn the whole thing over.
I'm just going to fold these legs.
Now when you fold these legs, that releases this pin.
So there's two pins, and then the slats slide into the legs, just like that.
So it stores away very compactly, and then it does have a carry bag.
Very nice, 500 weight abrasion resistant nylon.
And then there is a bag for your pins to fit into as well.
So that's the table.
Very nice accessory for this system.
Thank you for joining me for a closer look at the Sumo Stove Expansion System.
Now this system is brand new, even for me.
So I really look forward to hearing your feedback as you get out there and go on your adventures
with your sumo system.
Even if those adventures are just in the backyard.
Have fun cooking on your new sumo stove system from Firebox Stove.
Thank you everybody.
Bye.