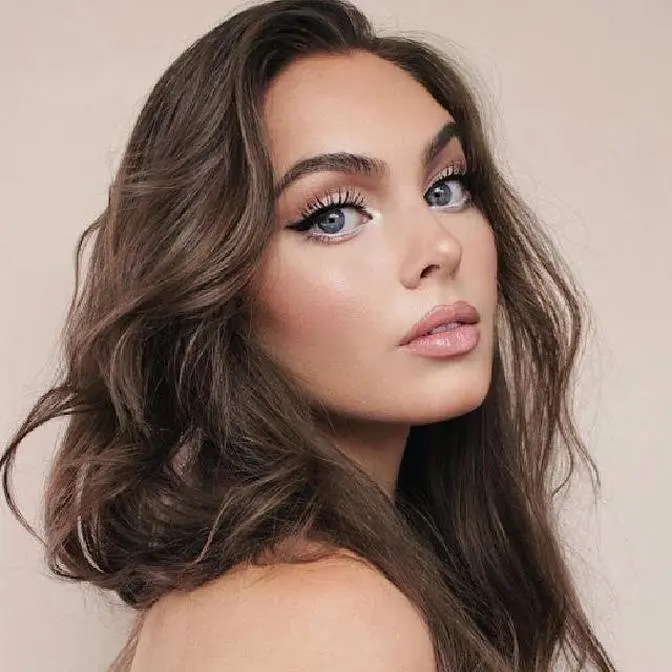
Hey it's Jackie, & for today's video we have a Billie Eilish Makeup Transformation ft. THE BOY BEAT makeup style! I love Billie's music & always wanted to try some Boy Beat makeup techniques so I combined the two & hope you like the look! Also what was your Billie Eilish Bury A Friend reaction?! I loved it! THUMBS UP if you like this tutorial & make sure to subscribe & ring the bell notification so you don't miss any pop culture tutorials :)
comment below your Billie favs! First song I heard & fell in love with was Watch & because Mackenzie Ziegler covered it, then Ocean Eyes which was on repeat for a solid month, & now I can't stop listening to when the party's over & come out & play! If you missed her latest music video for bury a friend it is creepy af & so well done, check it out! https://www.youtube.com/watch?v=HUHC9tYz8ik
High end pair: Solotica Natural Crystal (Cristal) - almost 100 dolla, do look realistic af in person. on camera with the light my pupils are so small so it looks less real, but in natural light they really blend into my natural eye colour which is already blue! If you are getting these just for fun, I'd suggest the ttydeye pair to see if you like the look before investing.
Benefit Porefessional Primer Benefit Hello Happy Foundation (1) http://bit.ly/2PXNqkh
Disclaimer: Not Sponsored, purchased all products with my own money other than products gifted from Benefit & Charlotte Tilbury & MAC through PR. I use the products I think suit the video best each time, links are affiliated :)
hey it's Jackie and welcome back to my channel for today's video I am
recreating a Billy Eilish inspired look and I really wanted to do this because
about a year ago the boy beat makeup trend was popular and if you've never heard of
this trend it's where you're taking qualities that are typically considered
flaws like discoloration to the skin unkempt brows and then enhancing it
slightly so I thought this would be really fun to try with the blue hair do
some boy beat makeup techniques and then also added some highlight that I have
seen her wear when she's more stylized so if you enjoy this video make sure you
give it a thumbs up and subscribe for more pop culture videos and I never do
tutorials based off anyone that I'm not a genuine fan of so I thought I would
share my pop songs and the first one I ever heard by Billie was watch and then
ocean eyes I loved come out and play , I play that like every morning & when the
party's over when I'm feelin sad. the bury a friend music video I'm obsessed with
if you haven't seen it it's very American Horror Story Asylum vibes
give you all the creepy feels so check it out if you missed it and I know this
is a little different for my channel I'm super girly but if you want to see it
more looks like this and just let me know and of course a comment your
favorite songs below and let's just get started last thing before I haven't been
a like pass out from talking so much but at this hair color I will have more
information about it at the end so stay tuned and let's start with the makeup so
here are my natural blue eyes and the first step I'm doing is applying colored
contacts of course totally optional but I usually buy my pairs from a site
called ttydeye.com I'll have them linked down below and you might have seen you
have green eyes or brown eyes and this is where those contacts are from but I
decided to doubt a more luxury a pair of lenses so
this is a higher-end option again all of the details will be listed in the down
bar and this is a brand that Kylie Jenner has been seen wearing so I wanted
to give them a go and for this boy beat makeup trend I'm going to apply a matte
base through the t-zone I forever love the benefit professional and typically I
go with a dewy base to liven up my skin but I'm going to create more of a duller
appearance with some stylized highlighter later on off-brand for Billie
but again another benefit product the hello happy foundation this is one of my
favorite everyday foundation picks and I do have discoloration around my jawline
and neck that I'm kind of hiding with this blue hair here so I'm applying a
thin layer over that area but leaving my nose around my eyes and cheeks mostly
Barre I find using a bit of a lightweight foundation and blurring over
discolorations is much more foolproof than individually concealing each spot
and it takes a lot less time to really make sure to blend the natural skin into
the foundation use your finger and warm up the product and pad off any excess
you all know I love a good nose contour I am using the Fenty amber stick this is
the best for nose contour at least when I'm this pale and I have to thank Gina (Shkeda)
for this recommendation I saw her use it on Instagram and I tried it out and I
loved it I'm creating a rounder a wider nose tip adding shadow around my
nostrils to enhance their width and as well creating more of a prominent
divot between the lips and more structure between my nose and eyes and
I'm still using this Fenty stick and bringing in some discoloration around
the eyes like eye circles for feet and I'll build this up throughout the
tutorial with more skin tones another contour tip that I tried that made a
really subtle effect but I did like it is taking a bit of the shadow above the
lip line so it makes the outline of the lips pop a bit more and look a bit
fuller so this can easily look like a mustache
so subtlety is definitely key if you want to try this out and next up
glossier I bought some glossier in LA last year and I don't grab for it a lot
in videos but the cloud paint and coconut lip balm are my favorite
products from the brand so apply to the back you're handsome cloud paint and
then add to the cheeks with your finger I also added this to the lids for a bit
of a pink tint and here I'm using a lipstick palette from this matte
collection I love this collection so much I did a giveaway back when it came
out but all you need is some cream based products without shimmer and purpley
reddish pink and peach hues start with the purpley veiny shade and apply this
at between the eyes to create a deeper divot and then with a red still in a
cream take a bit of this product and run it underneath the lash line and smoke
out from the top lashes
take a matte peach and blend above the outer and inner crease I'm just using
patting motions and you can use eye shadows for sure that our powder this
looks really real though on natural skin texture and I do want to mention these
lipsticks were unused so there wasn't any mixing from mouth to eyes if you
have sensitive eyes that can be not so great for your eyes and also with red
sometimes it does stain the skin a bit so try to use all these products
minimally and with some leftover lipstick on the brush i dabbed on to the
cheeks for more skin variation time for brows I'm using my go-to for a quick
brow fill in the benefit goof proof in the shade at 3.5 I made mine a little
too thick actually but luckily I am covering majority of them with a hat
later and you want the shape to be full and straight with a bit of a sharp arch
I added some browsing powder to deepen up the arch and the most memorable thing
about Billy's brows are these stray hairs that are fanned upwards especially
on the left very Cara Delevingne and I set these hairs in place with the
benefit gimme brow plus if you need more of a stronghold and you already have
darker brows tried the Ready Set brow to keep them in the shape you want and this
next step really adds to the effect of Billy's huge eyes line the waterline
with a matte peach liner this is anastasia base in one and this is great
for this and touching up the brows and then take a black liner and really
lightly smudge it throughout the bottom lashes and
top of the lashline here's where we're kind of going away from the boy beat and
we're gonna add some spidery at bottom lashes I'm using this Mac mascara and I
like the one of this one but if you don't like scented products then I
wouldn't go with this I didn't use the Revlon volumizing mascara here because I
thought the Mac packaging just suited the look more honestly
but the Revlon one is my actual go-to everyday mascara so if you're looking
for a new one I would try out the volumizing it's really great and this
looks really cool with the bottom heavy eyes I really like it but then I did add
mascara to the top and we don't want these lashes to be fluttery and curled
upwards but more weighed down to get more of a sad eyes shape I took my worst
nightmare individual lashes and I'm going to add these downwards and extend
at my lash line these were so curly which is what I wanted for the other
lashes but they were hard to apply so I just used duo glue I went in with three
on each side and then kind of gave up on it but I wish I didn't apply mascara on
top of them because it did mess with them a bit much but if you're brave go
for it you can add more mascara and to keep the spidery look alive here I'm
adding more shadow I was just using the browsing zat deepest shade and I use
this again underneath the eyes I was fixing up some of the nose contour and
just the main thing is making sure that you're using matte products for this
I noticed her inner tear-duct it looked a bit more sharp in catlike so I added
in a slight point and this lip product I'd never seen before in Canadian stores
so let me know if I'm wrong but I used the pink velvet lip tint and I picked
this up at CVS and you can also order this online I love the feeling of this
k-beauty product it's so smooth and you can build it up and blend for a natural
lip tinted look and once I got the color I wanted I touched up with a liner
pencil on the top to slightly over line
to have the lips looking more full and still natural I added a brown based red
to the outer corners this is one of my favorite shades from Charlotte Tilbury
it's called a perk and Brown and always check the down bar because I do try to
write dupes for expensive products I use and it does take me a hot minute so
thumbs up for my efforts and next two steps are totally optional you can stop
the look here but I love a lot of different highlighters but nothing tops
of my Charlotte Tilbury a beauty light wand this always gets messy because I
never close it right and then travel with it so apologies for presentation
but this light wand it just picks up the light so well and it always makes my
nose contour look way more believable a little goes a long way so this does last
a long time
and I added a bit of highlighter right next to the under-eye darkness as well
and I love the contrast of glow and then the dullness
a lot of the time in shoots Billy has a gloss to match the highlight my favorite
gloss is Charlotte Tilbury collagen lip bath this has a little heart-shaped
applicator and it's plumping it's my favorite and a similar gloss for Mac is
the plenty of pout plumping lip gloss and that one smells like heaven so
they're both really great and boom there is the Billie inspired look
I wish the lashes were a little less crazy but you know what the boy beat
style is supposed to be a little rough around the edges and the spidery lash it
does work well if you mess it up so if yours looks the same as mine just rock
it and I added a couple more freckles around the nose tip and this is a fun
little tip if you want to enhance the appearance of an upturned nose and if
you missed my Carrie Diaries tutorial where I've recreated both Carrie and
Dorrit slook be sure to check that out especially if you like more of an edgy
style like this a lot of you preferred the Dorrit style over Carrie so vote in
the poll if you are typically more girly or edgy and I finish this look with an
oversized black sweater a beanie off Amazon and let me get into this hair in
the outro so just keep on watching
I hope you enjoyed this Philly look and if you did make sure you give it a
thumbs up and subscribe for more pop culture videos if you're not following
me on instagram you can find me under Jackie Wyers and i'm always promoting
videos that are up and coming like this Phantom of the Opera look, i'm really
excited about this one because the dress is stunning and i'm just waiting on some
more (hair) clips to come in the mail so that one's coming soon and then oh the hair
right i was going to talk about the hair color so none of this hair is mine it's
not a wig I took extensions and then I split them in half cut them in more of
like a shaggy style and then I colored them with the one day colorista sprays
from L'Oreal and I used both of the blue shades and kind of mix them together and
this did give a really good blue the feeling is like straw and this does I
would say it does die blonde hair because I tried to get it out of another
set of extensions and they just did not come out but I think on darker hair this
would wash out fine I do want to give a big disclaimer though if you do want to
do a temporary color on your hair and you're a little bit younger know that
this gets everywhere and so if you're spraying this in the bathroom and it's
getting in the air it's gonna leave a small film of blue like everywhere and
if you don't clean that up real good it's gonna get like on your feet and if
you're walking around your house on carpet there's just gonna be anger from
parents and I will let you know right now because when I lived at home I had
this issue before so yeah be sure to really clean up or better get spray this
outside but know that this hair transfers so I like can't touch my hair
or it'll get everywhere and I couldn't wear white because it just gets
everywhere so yeah there's my little rant about the spray
it's really not meant to color your whole head though it's meant just to add
like a little accent of color so it's perfect for that and definitely it's fun
products that's just my full morning though and
as always I love it when you guys send me recreations and I love featuring you
and videos so here are a couple of my favorite art and just pictures you've
sent in so thanks again for watching and definitely let me know your Billy
favorites down below and I'll see you next video