
DIY Pokemon School Supplies - Red Ted Art TV - E1
18 Video Views·Feb 21, 2023
DIY Pokemon School Supplies - Red Ted Art TV - E1
Comments are disabled for this video.
Hello, hello! Welcome back to Red Ted Art. Oh my goodness, it's so good to see you!
Today I have a very special new type of video for Red Ted Art and I'd like to get your feedback on
it. I'm doing special episodes, so Red Ted Art TV straight into your YouTube channel homepage.
Basically, it's a bit like my other compilation videos, I think you might have seen a couple of
them around, but instead of speeding them up, you know what? Let's sit back with a cool drink,
take our time and really get into the detail. So I've got three crafts for you today. For
those of you who love Pokemon, I'm sure you've guessed that already, but it's not just Pokemon,
it's three Pokemon crafts that are related to back to school. So come on, keep watching,
keep making and let's see how they're all made. So the first craft we have for you today is,
as indicated already, these fabulous tin can Pokemons. Now I love these because you're
recycling, you're making the most out of a bit, you know, out of old tin cans and you're really
getting your desk in order for the new school year. They're really quick and easy to make.
I have two versions, one is the make-it-yourself version and the other one is a printable,
and the printable is so quick. Literally, you run them through the printer, cut them out,
stick them on, job done. But anyway, let's have a look at these great desk decorations,
stroke desk tidies. So for each Pokemon, you will need one tin can,
you will need some paper in the corresponding colour, you'll need a little bit of scrap white
paper to do the embellishments, tape, a little bit of glue, pens and scissors. Now, if you don't have
the papers in the right colours, I understand, so I have created these printables for you. So
you have a choice, either you print and assemble, or you create your own. So it depends totally on
what you have at home. So the first thing you need to do is, is to make your paper the right
size to fit around your tin can. Now to do that, you take your tin can, you wrap your paper around,
get it as neat to the bottom bit as possible. And then you give it a little gentle squeeze
around the top to create that kind of crease. And then you cut it out. I should have creased it all
the way. But it's okay, we can manage. I think that fits well. Cut off a little bit at the edge
because we don't need all of it. I think that's a good fit. Keep these pieces because you can
use them for other projects. And then prepare all the other three colours. I'm just going to
quickly cut those out. And then when we've got all our sheets ready, we'll do the next step.
So we have our four sheets of paper cut out. We're going to put them to the side. And now
we're going to create our features. I'm first going to draw Squirtle and then do all the
other characters. And you can just watch those in fast motion. Just make sure they're all the
same size. It doesn't matter too much how big you do them. It's really a question of preference.
As long as they're the same size relatively to each other. So we have all our faces. Now let's
just check that we're happy with them. And if we are, we can glue them on. Now these are probably
slightly smaller than my printable versions. But I think that's okay, because it's just a
handmade one, isn't it? So we have to get them in the right places. I think they work for me.
Yeah, it's good, isn't it? Okay, so I'm going to glue them down. And after I've glued them down,
I'm going to add some little details. But we'll speed that bit of the video up again.
Okay, so we have our four pieces. Now, as mentioned before, we do have some printables.
I made these slightly wider so that you can trim them to fit your tin. So you've got one of the
slightly different faces. But I think that that's fine. So you can use those. And that's actually a
lot quicker. But you know, you need to have a printer for it. And now we're going to stick
them on. It's really easy. What you need is a little bit of tape. Let's find the edge to tape
it to the end. Put this on the back, then you won't see it. And carefully but neatly, curl it
around. And then you take a second piece of tape and tape it down. And then I'm going to repeat it
for the other three. And then we'll have a look at all of them together. So cute. So easy. So
let's take a look at the others. So all four cans together. Aren't they adorable? So fun.
Just made from paper, a little bit of tape and a little bit of glue. Okay, so how was that? Did
you enjoy it? I hope you did. I love them. And I think they're so cute. And they look fantastic.
Anyway, that aside, let's get on to the next Pokemon craft. Now, those of you who are familiar
with my channel probably have seen these before, but I'm always getting new viewers, which I love.
So for those of you who are new and you haven't seen these before,
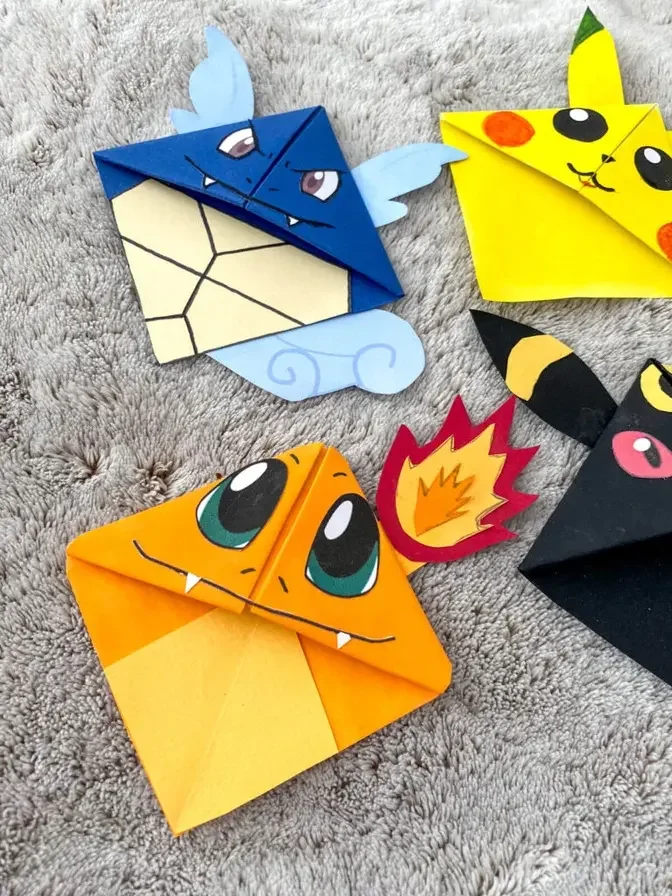
here is the next back to school craft. So we're going to be doing bookmarks. So this one is a
Squirtle. We've got a few actually. We've got Charmander. We have Bulbasaur. And of course,
we've got, I think Eevee's gone hiding somewhere. And we've also got a good old Pikachu.
Now, in this video, I'm going to focus on, I think Bulbasaur. I really love Bulbasaur.
But obviously there's links down below for the other characters. They're all made in the same
way. You just decorate them in different ways. So we'll look at the Bulbasaur video now. And
if you do want to have more, you know, don't forget to look in the iCards and you can check
out all the other videos. So come on, let's take a look and see how to make our Pokemon bookmarks.
It's Bulbasaur. So for Bulbasaur, we will need some light turquoise paper,
a little bit of green paper and some white paper. I also have a red pen, some green, a green pen,
of course, my black pens and scissors and print stick. Now, I know it's really hard to match the
colors up. So really, I think you could make it in light blue if you wanted to, or you could make
it in light green. I was really lucky that I happened to find this paper in some of my scrapbook.
So, yes, try and see what you've got. As with all our corner bookmarks, we begin by creating a
square. So I bring this corner up and line it up with the top. It's a bit thicker, this paper,
to compare to some of my other ones. So you'll see that this whole series has got different
types of paper as I try and match the colors. But, you know, who needs must, right? You can,
of course, just use pens as well and color them in. That also works. So I've got my triangle.
I'm going to, you know, so you lift it up, it's a square, fold it over. Now you bring this corner
and bring it up here. Like I say, this is a bit stiffer, this one, than my other papers,
but it also means it'll probably last really well. Now I'm going to bring this corner up
all the way, make nice, strong creases, especially if you've got card like me. Open it up,
bring one of the two flaps down, like so, and bring this over, tuck it in, and fold it down.
So again, paper's a bit thicker this time. And same with that one. Fold down, like so. Here we go.
Basic book corner done. Now to turn this into Bulbasaur, I'm going to have to add some little
ears and obviously make the very special eyes. I also decided I might round off the top. Let's
just round it off now, because then later when we add the bulb, we can actually see it. So I've
rounded it off. Now let's make the eyes. As always, I'm going to fold it in half. Then I'm going to
draw the eyes. So with Bulbasaur's eyes, to me, especially if you're looking at him from the front
I'm not quite sure. Is it a girl or a boy? It's got sort of like a triangle-y and then opens up like
that. See what I mean? So it's a sort of straight-ish line there going round and then coming straight
down. And then I'm going to cut this out times two. Yeah, I think that's quite good. You don't
want it too big. I can never tell when you're sort of drafting it if the eye is going to be too big
or too small. Sometimes I have to recut it and that's fine. Don't worry about it if you have to
do that. I'm going to use this piece. So I don't know if you've seen my other Pokemon bookmarks.
I've got loads of them, more than that in fact. I'm going to outline the eye just to kind of give
it that cartoony feel. Okay, now I'm going to add the details. I want to have sort of like a reddish
eye with a shiny bit in it. This is quite red. I think sometimes Bulbasaur's eyes look a bit pink
but I quite like this. This looks good. He's a bit grumpy, doesn't he? That's okay. Sometimes they are a
little bit grumpy because they're being chased. Now very carefully put the glue on. You don't
want to smudge anything. Now I think Bulbasaur's slightly beak-like and again it has two little
dots as nostrils. I'm going to put a line here and a line here. Now I need some ears.
They're basically just triangles. Always make them a bit bigger than you think you'll need because
you need a bit of surface for gluing. I wonder if I've been doing that off screen.
Apologies if I have gone off screen a little bit. I get so carried away doing my craft that I don't
always pay attention. I don't know if you can hear that. My neighbours are playing some music.
Right, now I want to add some little details. With this one I'm going to pretend that the paws are
actually facing forward because I think I want to have a little bit of the... I want some extra
colouring basically. So I'm going to just, with a pencil, very carefully draw some paws. It doesn't
have to be accurate. And then put some... technically these claws should be white but
I think I just have to leave them. Unless you want to get little bits of paper and stick them
on, that's okay. And now I'm going to add some of the markings on the top. This is just a green pen.
Do like a slightly bigger, a little triangle on here and another one here. I'm going to put some
on his paws. It's looking really good. What do you think? So this is your basic Bulbasaur done
but I want to add a bulb to his back. So time to make a bulb. I'm going to cut a piece of the green
paper off. This is actually the second bulb I'm making. If you're very eagle-eyed you will have
seen that I knocked the camera earlier and then I had to readjust it. So for the bulb I'm going to
draw what looks like an onion. So it's like a big circle and then like a leaf in another bulb
behind it and another one behind it. I don't know if you can see that but you will in a minute once
I've added the black. As always it's not an exact science. There we go. Ah I think that's quite good.
Now what you want to do though is you want to do another mark on the back because you're going to
be able to see the bulbs from both sides. You'll see what I mean in a minute. Okay so when I glue
this on you'll see the bulb from here but also from here. So I'm going to glue it on and then
when you turn him around you've got the bulb there as well and then if you want seeing as you've got
the back now you can also add some little details. There we go. Isn't he fabulous? I do love Bulbasaur.
We do love a bookmark don't we? Honestly I can never have too many bookmarks. I don't know about you
but bookmarks are so handy. They're great little gifts. You know what if you lose one you just make
another one. I've got over a hundred. Brilliant. In fact if you want to see them down below I have
a video where I do my show and tell of all my bookmarks to date and you can have a look at that
as well. Okay it's time for our third back to school Pokemon craft. What will it be? Let's
have a look. I'm trying to reach for them. Okay I'm just getting them into a little bit of order.
Oh yes it's a them. It's not just the one. Okay let's see. Here we go. Can you see those? Okay
they're little notebooks. Look at them. Really really cute. Now I use a little bit of glue to
cut out and stick on the faces but otherwise the rest of these are no glue and they're really
simple. No staples, no glues, no sewing or anything like that. Although those are really good bookmarks
too. Not bookmarks. Notebooks. But we have four little notebooks and they're so so cute. So it's
a cute little back to school craft. Obviously it's not it's not a super handy one it's just a fun one.
You know you can write little messages to your friends, you know you can write little stories,
all sorts of things. So come on let's take a look and see how they're made.
Right to make your basic little notebook all you need is is two sheets of paper of contrasting
colour. Depending on how many pages you want you can actually make several books out of one sheet.
So in fact you could make four orange books out of one and four seven page or six page
booklets out of the white sheet. But let's start with the outside. So to start off you're going to
fold your piece of paper in half. Now some of you will no doubt ask can you make these in bigger?
Yes you can. You just have to make sure you adapt the dimensions. But this is the easiest way
for an A4 sheet of paper. If your dimensions in your country aren't exactly A4 that's fine. Use
the ones you've got follow the instructions and you'll just just get a slightly different
shape booklet. Next thing you'll do is you'll fold this in half and cut. So this is now one cover
sheet and like I say you can use the extras again for some other projects and it's really easy. So
to make your cover now you need to fold. Actually I'm not going to fold all the way in half. I'm
just going to give a little marker here. This is I want to find my middle and the reason is because
I want to have a nice neat front cover. I don't want to fold going across. So I've just given a
little marker. I'm using that as a guide and I'm bringing the outside edge all the way to the
middle. Turn it round. Repeat. Bring the outside edge all the way to the middle and make sure
you've got a nice neat crease. This time I'm going to fold it in half that way. So bring the that side
over to meet the other side. Open up. Now this time I am not going to the center. I'm going
check this just about two millimeters from the center. Do you see that? That's not quite to the
center and this basically allows your pages to fit in a little bit neater and also if you're
bulk. So if you see this is not quite to the center. So this is your outside. Yay! They all
match. Isn't that great? So I've got my outside ready. Now I need to get my pages ready. Again
you take your white sheet of paper. Fold it in half. Fold it again. There we go. Create a nice
long piece. Now as I'm going to cut this I'm going to cut just inside the white line and that's
because when this slides in you don't actually want it to be exactly the same width. You want
it to be slightly smaller so that it does fit inside your booklet. So I'm going to cut slightly
inside. Not much. Just about a millimeter. So it's going to be slightly, slightly smaller.
Put this to the side and now we need to fold it in a concertina fashion to fit in. Now to make
this as neatly as possible I've started off by just creating some guiding folds. So I'm folding
it in half. Don't make this crease too strong because you're going to change it again in a
minute. So I've kept folding it in half a few times. I'm going to unfold it now because I just
wanted these creases. So the first one is you have to fold it in this direction. Now I'm going to do
a concertina fold in that direction. Fold in this. Bring this fold over. Try and get them always
lined up and now get your creases nice and neat. So it should look like this. Okay so it's a
concertina look. Tuck it in and then take the other side and again you see these these folds
you can tuck it in. Now that is your basic booklet finished. Isn't that neat? Now that's obviously
only got six pages so if you want to add more pages what I've done on the yellow one is you
literally repeat that last step. So you've got another concertina and then you take one page
tuck it in make sure it fits. Here we go. I think that fits she says and then give it a good crease
and that will actually stay. So if it bothers you you can glue this together but I know some
of you will go but you said this is a no glue graft. It's no glue if you leave it like this
that's fine but if you want you can of course glue the center ones together but to be honest
I don't think it's necessary and that is very easy two colored mini notebooks. Now I think
they're really really cute. Now as lots of you love pokemon I know that some of you would like
me to maybe decorate them. Now I'm going to decorate them using paper pens and a little bit
of glue and again those of you who said this is a no glue project you're quite right it is a no glue
project. You can just use pens on the front that's fine. I just love the extra detail that you get
from using white paper and sticking it on. You don't have to do that just color it in
don't worry about it these are no glue notebooks and I think they're really really cute. So I'm
going to speed the video up for this just sort of because it'll take ages otherwise
and you can watch me decorate these and turn them into adorable pokemon notebooks okay.
And here they are all finished. Aren't they adorable? I think they're absolutely wonderful.
Right that was it that was our first episode here on Red Head Ted Art. Now I really hope you
enjoyed it. I enjoyed sharing these crafts with you. I enjoyed not rushing through them like I
sometimes do. I mean I'm still experimenting with the different formats so as mentioned before I
would love to hear your feedback. Obviously a longer video you need more time to watch but then
you get all the details so there's pros and cons to everything. If you like this video please leave
me a like a comment of course subscribe to the channel but above all and this is what's really
important about the whole channel it's keep watching keep making and of course I'd love
to see you again soon. Take care and happy back to school. Bye!