
Rendering Skin Tones in Oils - Free Lesson Viewing
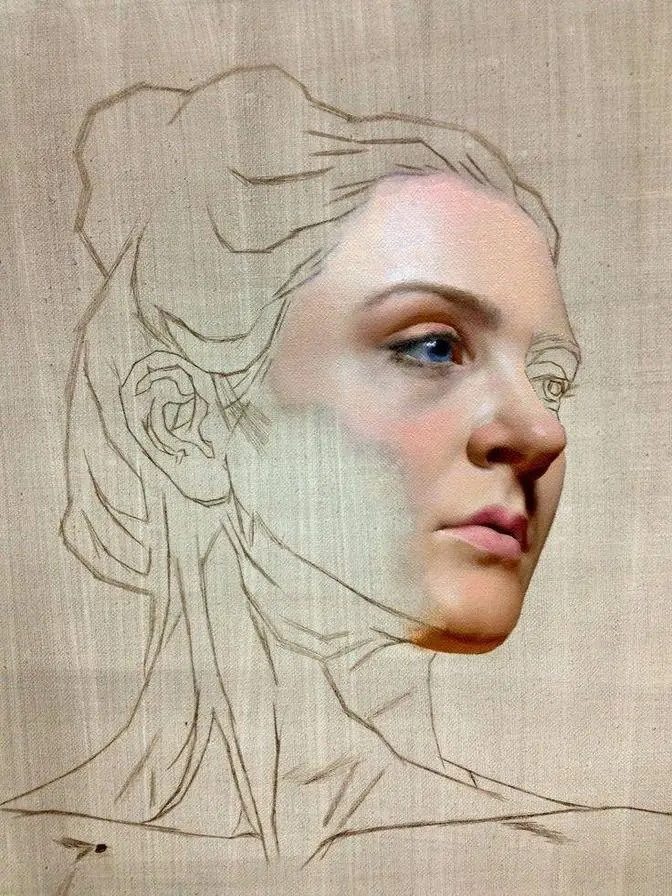
#GJWart #portraitpainting #portraitart #oilpainting #oilpaint #potrait #painting #drawing #art #arts #traditionalart
AI GeneratedMay contain errors
Yesterday we've been talking about the value range for the skin tones and different keys.
So today we are going to practice mixing and applying thus the half tones which we need
to render the skin properly and we are going to ignore the the key because the reference
is a low key reference but we are going to use we are going to paint high key painting so we are
going to use the tone of the canvas the value of the tone of the canvas as our background at least
in the beginning to force our ourselves to find proper and working value relationships inside of
because last week when we were doing rub out technique about practice the main focus was
mostly in the how big areas of dark values are being separated from the light values so we've been
modeling everything starting from the silhouette and simple or simple contrast relationship between
the silhouette and the and the light value of the skin today it is it is different today we are
to work with with halftones in the face first so I'm quickly mapping the design
the silhouette of the face of the head here first just remember today I am going to use
Gansol so I'm diluting my paint with Gansol if you are not using Gansol and other solvents just
continue using the gel or just or probably paint without it without mediums at all
I don't like the distance this one because I already see that the head will end
too close to the right side of my canvas so you see with Gansol I'm just erasing it quickly
another thing to practice is your ability and will to disregard the decision which is
not going to work entirely as we want so in the beginning I prefer to to have such flexibility
so now I want to make the head a bit smaller yeah maybe maybe something something like this
and the shadows will be will be here so yeah I think it works much better and without
spending too much time on the bloating I'm going to jump into the skin tones right away so I'm
quickly just mapping the the boundaries of the of the head uh with indication of the neck here
and the ear is going to be somewhere somewhere there
yes something like that okay so let let it let it dry for a second just to settle this
very quick loose I don't know not even the drawing just something the the bounding
the bounding area the bounding shape let's uh let's mix um let's mix something and we need
two mixtures mixture number one is general average shadow which we can see on the right of her face
so the light is coming almost from the center almost it is uh it is slightly shifted from the
center line of her head towards uh I don't or maybe it's just central I'm now I'm analyzing
the shadow below the nose it looks very triangular and with the with the downward pointing
tip of this triangular placed exactly in the field room above the lip we can say that the
light is pretty symmetrical so if we were looking frontally at her face it will be frontal light
so for us it is three quarters but the light is shifted or light is just situated there
or near the center aligned to the center line what does it mean practically for us
it means that still the the her left side right for us so everything to the right from the center
line is brighter slightly than uh things to to the to the left despite despite the shadow
the shadow to be so close to to the to the lighter halftone so we we're going to turn the form here
and also turn the form from opposite side because we expect that the distant planes distant planes
are slightly darker than the planes which are next to the nose we barely see them but still
so some sort of imagine the egg with the light coming from from the center of the egg so we will
have uh if if there is no nose and if there are no uh eye circuits and the muzzle of the mouth if
it is just an egg the light the lightest planes the lightest the most perpendicular planes to the
light source are going to be here so we are constantly thinking about the light lighter
lighter halftones be in the center and in the center here but with no supply things are more
or more complex and the shadow visible here and we don't see the shadow on opposite side because
the form is turning so for for that we need mixture like this probably we can add more
so we'll have some sort of composite brown shadow i don't want it to be extremely bright
so or dark sorry so i'm adding the yellow ochre now into the shadow and it is slightly lighter
it looks a bit too cold because this blue primary stone
so i'm adding carefully transparent red oxide into the mixture to make it more neutral so you
see it's now getting this generic traditional looking brown for the shadow so we will stick
with it for a while uh maybe yeah by the look of it maybe a little more transparent
like that okay this is going to be our our shadow and again my philosophy means that
we don't waste too much time on mixtures we need to find proper looking generic
value for the shadow and for the halftones in the light and we are going to make adjustments as we
go so this can be you see like kind of a pale orange the situated light value by orange can be
can work as the halftone for the face just two mixtures for now we are not discussing the
color changes today but we will start talking about colors next week so maybe we will touch
this subject just a bit so to start to start this uh this painting to start finding the halftones
what i want to do i will try to i will try to map the shadows as usual just quickly first just like
that uh shadow and and the hair is going to be darker than the shadow so with the same mixture
but thicker i am applying it only here at this moment because i'm not sure about the placement
of the ear i'm not sure about the drawing so there is no reason to invest into this area
at this point so just dark value to to compare my other values with it to have something to compare
now with combo brush with this rosemary eclipse combo brush i am diluting the mixture just with
gum straw at this point and what i want to do i'm just applying it right away so i want the mass
of this halftone to be to be here to be present already on the camera because i i need since i
don't have dark value to to the to the left i don't i cannot compare it i cannot compare
uh my halftones with dark value so i need the base first and this is very important
we need the base which we are going to change which we are going to to adjust and we are going
to find different planes because this exercise is also very useful for practicing planes of the head
because we know that if plane is changing the value is changing you see i'm adding a bit of
red now into the into the mixture which is in between these two pools you see i place these two
initial pools together next to each other because i'm going to to blend the mixtures together so
i can drag the dark towards the light and vice versa finding some sort of halftones which work
and look very uh natural naturally because i optically i i see things optically right away
so no guessing mostly just uh yeah comparing and picking what what uh what works the best
at this point so now with this initial um initial let's let's call it an egg some sort of an egg
uh this looks much darker than that so we already have something something substantial to to work on
we know that different value means different plane so every time the plane is changing
the value must change as well uh so we are going to turn the form using at least four big values
for the halftones but before we begin i want to i want to quickly find
the glabella bone here because glabella is the center line there are so many
it is one of the most important landmarks of the face probably the most important at all
and since i'm i noticed that there are warmer reflected reflected light inside of this eye
circuit inside of this corner i'm adding just a bit of of red into into that shadow
okay so now i'm just modeling the darks in the eye see i'm not drawing the eye
per se but i'm thinking about i'm squinting my eyes and i'm thinking about the dark shapes
and i i'm blending the darks now very carefully on top of my light brown mass
it was very thin and diluted with gum so it is why gentle you see like very careful and gentle
paint application does not smudge it so this is another thing to to consider if if if your
subsequent paint application is blending with with the previous layer with with a layer which
which is with underlying layer try to soften your application and try to use
less paint in the first layer and even dilute it with something which dries really fast because if
if you are using oil for example to increase the flow of the first blocking the oil will be
it can create a mess because you you will pick up the pigment you see like right now it's not
difficult to blend over it it is why my hand is always almost parallel i mean the brush is almost
parallel to the to the surface so i'm trying to carefully just apply things on top so now i'm
moving the the glabella to the left because i see that i need more distance here from the
corner of the eye to the eye socket and the nose will go like this over here
going back to this this is one quarter of inch brush for some reason they have numbers
on other brushes but these brushes their sizes are in quarters of inch it's fancy in my opinion
just water it's a relatively small one okay that the distant eye will be somewhere here
and we know now that we need to to expand this eye socket just a bit
was too much probably now but wait a second i need to check it first
you see the this is another reason why i don't really want to to invest in precise drawing in
the beginning when i paint a lot because everything is so fluid and we're going to build it up
instead of just feeling the like painting by numbers style
so it is why i prefer my the outlines and the silhouette i prefer them to be
not final in the beginning but flexible and ready to be changed so now i'm finding the
design of the brow here and design of the brow there i know that we need to move i need to move
the temple area now so with this initial stain i'm just spreading it outwards
you see uh adjusting the the actual size of the forehead so this is this is how we can start
working our prima as well no rigid drawing no rigid construction now you see like the actual
the head the top of the head will be like this it is why there was no point to make any decisions
and the ear is also will be moved to the right now i have more understanding of what is going
to happen here and even this part the jaw line i just want to to make it now disappear in some sort
of some sort of void down below doesn't mean that you have to do exactly the same you can you can do
the drawing uh and work on top of it because this exercise is not about the drawing again it's more
about how we train ourselves to work in certain value range in order to paint the skin even if
we have to even if we have to change the key or the background or you know make any decisions which
are somehow deviating from from observation so you see like here my my goal is to build something
which which is not a copy of what i see so the reference now and always for me it is just the
starting point the information the inspiration but not something which i am obliged to carefully
i hope it is not extremely confusing but even if it is uh you will definitely see the benefits of it
later with practice because i also can just apply the dark wires
later on top there is no problems with that i mean in the in the
background the question is will value range work or not so our practice is today is to be able to
paint the halftones independently from the background the halftones of our focal point
so i'm mixing against something uh just pale light yellow i'm using white i'm using
nickel titanium the pigments are you probably already recognize them on your white nickel
titanium yellow ochre transparent red oxide cadmium red light alizarin crimson ivory black
so now when we when we have a lighter mixture and it is more opaque i need to
apply it on top of that stain because there was a hair before and since i was just moving
things a little bit to the right and above it looks darker than i need so i'm just carefully
scrambling in paler paler light paler yellow pigment on top okay so let's let's say we have
something here i see that the outline of the of the forehead can be slightly narrower so i'm using
to organize it properly and i'm even erasing it here just a bit okay so
uh i think it's time for me to yeah and i also see that now that the eye
will be bigger i'm just adding more dark here
there some sort of blocking on top of the halftone mask so the blob comes first and
the halftones they come later on top okay i have this pale light mixture here
but i want even more of it so i'm going to to mix it now two different yellows
white a bit of king's blue to to knock down the yellow a bit more white
to raise the value you see nickel titanium is helping me to maintain
the chroma to keep it because without it it will it will be really grayish over there you know i
want slightly warmer halftone for the cheekbones and a bit colder halftone for the lower part
of the of the face so you see i'm i'm adding alizarin and cadmium into the mixture
to to change the value to make it darker and with more red here and i'm doing the same but
with viridian to to lower the value and make it colder in this part so we have light colder light
warmer halftone and colder halftone next week we will start talking about this
warm and cool relationships all these changes which we need which we need to to implement to
make skin look very more natural but now we are just quickly mapping things so i want to
i want to establish the lightest plane here because the form is turning different volume
means different plane so this plane here the frontal plane in the forehead is bright
and the top plane of the forehead also near or like central top plane is even brighter
because it is facing the light it is more perpendicular to the light so the highlight
the highlight here in the in the forehead is situated on the meeting of these three main
planes frontal plane top frontal plane and the plane which is starting to turn already but for
this exercise i'm not focused on the highlight at least at this point so you see i'm trying to model
the form using just logical steps logical logic increments in the halftone arrangements in the
halftone organization darker slightly lighter even a bit lighter and lightest and from the lightest
here we're going to turn again to the slightly darker and this initial stain which i which i
made before is helping me because it is already almost as as it should be there so you see i'm
painting on top not on top of the tone canvas and god forbid i'm not painting on top of the
will just uh distract me from from seeing the values properly it is why it is why we need to
tone the canvas first or at least to to tone it in the area in this in this stain of of the face
let us have a look the brow can will go higher but it is not needed for construction so i can
paint over it at this point focusing mostly on the on the bone structure of the eye circuit here
and the planes which are facing the light there versus planes which are facing down
away from the light source here so you see i'm trying to sculpt it uh using my
quick pre-mixes of the halftones and i also want a bit warmer darker one
yeah so you see this pool is already starting to show different different values and different
colors which i see on the face so very very quickly the pool of my pre-mixes
representing the values the main values and the main colors that's the main temperatures which i
which i now see in the face so technically your skin tones are here not there so if you see them
the palette everything is good try to try to make sure that you can just pick from the palette
the color you need or the value you need and if you have to mix again or
initially try to mix more than you think you need and it will improve efficiency
okay so now i'm just i want to model the planes in the zygomatic arch and you see
there is a shadow and next to the shadow we will have greenish looking halftone first as i see
in the reference and just next to it there will be pink pinkish halftone
we will just apply some pink here so step step step warm cool warm
and cool again to make this area not just lighter but also with a change of the temperature so you
see before before i continue rendering i want to to re-establish the shadow i want to make
shadow even darker now just a bit because this one looks as as as shadow more or less looks
pretty dark but we discussed that the shadow at least in this part especially in that part is
lighter than the than the terminator line then shadow line the core shadow because of reflected
light so reflected light the bouncing light is making that the rest of the shadow lighter than
the core shadow it is why now i am just revisiting the core shadow making sure that it is darker now
than than the general shadow everywhere else here i don't need any kind of edge so i'm just
losing the edge in this part softening it blending it together
since it is a demo i'm not i'm not trying to
since i'm explaining things i'm not so concerned about the accuracy of my
drawing but when i practice myself i paint a bit slower and i'm really really focused on
precision of my brush stroke so hence we hence uh there are certain
sacrifices in the accuracy but again knowing what we what our goal is is extremely important
and our goal now is to to practice use of halftones to turn the form
in the most delicate part of the painting so now we have darker shadow i want to mix even
slightly darker transitional halftone here like that you see it is it is very
it is relatively green it is not extremely green although although you can you can push
the greens even more but from the brown of the of the core shadow terminator line i shift to the
kind of a greenish gray of the transitional halftone and this halftone which is which is
already lighter than transitional because the form is turning towards the light it shows
local color in this case it is pink something something like that
now you see like we have we have this band we have this band and we have this band
they each each one is representing different planes and we are we are
showing that planes are different not just with change of value but also with change of
temperature yesterday at this point we are just doing it uh and next week we will
dive deeper into the concept but i'm sure many are aware already so just let's let's focus on this
on how different planes are changing with different values so now the next the next step
here is making this value lighter because here are the here are the planes which we discussed before
the planes which are most most perpendicular to the light source so i am applying now
almost you see like white mixed with a bit of yellows so i'm just pushing now the values
quite drastically using using using pale yellows but the side of the nose is darker of course
we can see it clearly but also there is there is a certain pink there so i'm i'm picking up this
pinkish orange mixture from from this side and i'm applying it here and now we have this
uh the landscape of the planes already established you see i'm not even touching
the distant part although we can just make it a bit lighter here you see just uh to the left
from the nose next to the nose we are just making it slightly lighter it helps to to fix
the drawing of the nose for example and at the same time it is uh separating the top plane of
the nose from from that distant uh plane of the face and it is helping to turn the form
on the distant side as well so i'm just visiting the top plane of the nose again
and now we have this uh this simple distribution of planes
and while notice i haven't been painting the mouth because uh it is it will take a lot of time
and it is not our focus we are using this uh this this painting this head and this reference
to practice turning of the form so mostly it is the cheekbone area and the forehead but feel
free to to continue painting and we will also play with it next week the same as our previous one so
if you can if you can keep it keep this one as well on the side by the way is 9 by 12 but it is
absolutely not important can be bigger can be smaller doesn't really matter so now i want to
to finalize that turning of the form on opposite side you see no gamsol anymore gamsol was only in
for me to be sure that this initial stain is thin quickly quickly applied and dries
as fast as possible because it is much easier to to paint on top when when your first stain your
first initial paint application is already settling very fast but we need lean mediums
also for that not just to keep things uh organized with thickness but also to make
sure that even in ala prima the first application the first stain will dry right away so the form
is turning i will probably want to add more light in the forehead because forehead is the
is quite big it is a big area and it is facing the light perpendicular to the light source
and it is also nearest planes of the skin nearest to the light source so
logically they should be lighter than the chin for example and photographs they
they doesn't they don't show it very often sometimes at least when i when i make photos
i try to to make them in the way and also in post-production and make them to resemble this
this structure this relationships with the light as good as i can can make them but it is better
when when we paint from life we just have to squint and we will see that the light here is
stronger than the light there i mean the highlights or the light planes they are still
they are more potent than on top on top than on the bottom of the structure which is again
very illogical in my opinion okay so i'm adding a bit of thing here now just just to turn the form
again and i'm blending blending the it with the with the previous layer with the next layer
because it is rather rounded uh part so there is a better battle logic cylindrical logic
i'm also dragging the shadow just a bit here to connect how it goes better
so basically this is the first blocking which you fall a primo painting
which can be used as a start for so we can continue let's say we can spend three hours
painting the hair the mouth so i will spend about one hour modeling the lower part of the face
it is what it is why i'm not touching it now because i would rather make sure that
upper part and middle part is already working so now before before we we call this exercise
size finished i need to to push the temperatures in the extreme light i need a bit of titanium
white for that i pick up white i apply it here into my pool and i'm also adding the king's blue
so you see the mixture is not as bright as it was with white but it is significantly colder
and you can see how does it look on this pool the value is the same almost the same
but temperature makes this value look way brighter than the yellow one because of the
temperature shift so this is another way of showing different plane in the light because
if i push the values now lighter i will start losing the color so instead of
mixing it with more white trying to paint lighter i'm creating an illusion of change
of change of the plane by painting the lightest plane colder especially when it is juxtaposed
next to it so something like this can be and is i believe good foundation
for rendering the skin without relying on the background in our setup or in our reference
so my recommendation is to practice using photograph as just database of information
without trying to copy because you see this is not the copy i'm not even trying to match the
values or something i'm just looking at the photograph and i'm trying to analyze which
planes are more perpendicular to the light source uh and how values are changing and how colors
can help me in order to to show that the planes are changing finally the highlights in the nose
they are not final they're not it is not commitment yet but i oftentimes i just place the
highlights in the nose uh right away because here the highlight is showing us the changes of the
so the meeting of top plane and the side planes let's say of the nose is
marked by the highlight so this highlight is just reminding me about the structure of the nose
and i can start comparing it with uh with my reference in order if i need to yeah to
to paint the nose more accurately and also i can just step back now to see that
nose is showing this um illusion of something which is sticking out of the face and casting
the shadow uh and this part alone is creating depth in painting where there are no actual
shadows or no actual dark colors at this point so this shadow this occlusion was probably not
the bad idea to say but probably too dark because now i have to mitigate it with
with some additional blending and yeah of course we can we can uh just play
a little bit with with our soft brushes just to model things and to soften the edges to leave it
to dry so this is the end of this exercise uh just to to test how values of the skin
look like uh compared with with shadows let us let me take the brush
i want to mix dark browns for the hair again the medium
transparent red oxide with a bit of black just to make sure that it is not extremely red
something like this mixing a bit with a pool of greenish halftone
so let us just place it here i think that exactly the same thing as we discussed yesterday
dark value from outside of the skin something which is darker than the skin generally
to see things in comparison and just for the way for later indication of the hair
something like that and now i start to see that the skin is not just turning the the face is not
just turning the i mean three-dimensionally i see that skin is starting to show this glowing
effect the luminosity and this luminosity is can be achieved by changing and shifting the
temperatures in the in the main in the changes of the main plane so once again different plane
is different value and different value means different color all the time so something like
this just just to see how will it work maybe the forehead can be a bit smaller now and always
back and forth but with the soft brushes and when there is no commitment yet it is
it's just amazing to move the edge higher or lower and also just a bit of adjustment
something like that so thanks for watching try to try to do something similar you you can you
can continue with with the with the mouth there is no limitations but i hope the general idea
is clear here for the mouse is exactly the same but it is way more complex because the shapes
are much smaller as usual the the most important contribution to three-dimensionality
is happening here in the cheekbone structure and how cheekbone structures
are being related to the nose so yeah this is it